
Hello creative friends! Today I’m sharing two cards that I made after participating in Altenew Academy’s Stencils Unleashed: Advanced Stencil Techniques online course, instructed by Nicole Watt. I took this class as part of my Altenew Academy Level 3 certification. Nicole is a fabulous instructor, and I sure do miss her weekly online live demonstrations! She did a fantastic job on this course – lots of extra information for each technique. I love her style, and enjoy how we can see her creating in real time, thinking outloud through her creative process, making real mistakes, and adding all sorts of tips and tricks along the way.
The inspiration for this card came from one of her cards. She started with a simple background, colored by blending ink through a geometric stencil. She then added a “silhouette” scene over the top, using black ink through several stencil masks. The focal poiint of the card was a vase with several floral elements, all dodne in black ink as a silhouette. She also did another card with a similar technique, but used a solid image colored with gold embossing powder, instead of black, to make a gold silhouette. Am I not explaining it clearly? You’ll just have to take the class to find out! You won’t regret it!


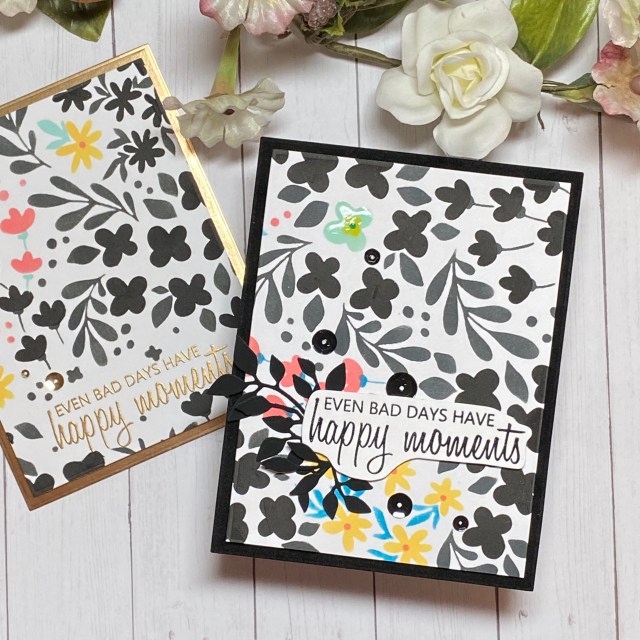
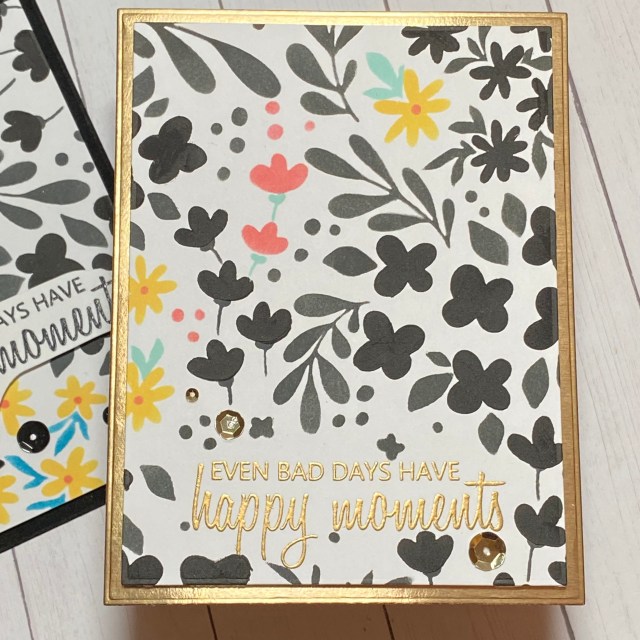
I used the Altenew Blooming Flower Bed Builder Stencil Set for this card. I wanted to have a few colorful flowers in a sea of black, silhouetted flowers. I colored a few of the flowers with a small sponge blending tool, using masking tape to cover up the pieces of the stencil that I would later color black. I played around a couple times before I decided on how much I wanted to color, and how much I wanted to remain black. After I got a few of the flowers colored, I colored in the rest of the flowers and leaves with black ink. That was a good start, but I wanted some texture. This year, Ranger and Tim Holtz came out with a black texture paste. You could also color your own white paste with some black reinker. It looks like a mess, and it is, but it cleans up with water, and added a little something extra. I only used the paste over some of the black flowers. Sometimes you need to get messy to make a “clean and simple” card!
To finish up the first card, I used a bit of Glossy Accents over a blue flower to highlight and focus on that flower. I stamped a sentiment from the Altenew Bad Days Happen Stamp Set. I felt like I wanted that one blue flower to really stand out, so I added some black die cut leaves (from a different brand) behind the sentiment, and a few black sequins.
After I finished that card, I had another thought to stamp and emboss the sentiment directly on the background. Starting with a frresh piece of cardstock, I stamped the sentiment then embossed in gold embossing powder. Then I used the same process as with the first card, just avoiding the sentiment area. I did add a few more black elements aroundd the stencil to make it fit into the design a little more. For this card, I used some antique gold Altenew sequins, and mounted the card front on a piece of gold cardstock. Both cards are A2 sized.

I went back and forth over which one of these cards I liked better, that I would use for this post. Seriously, I changed my mind 5 or 6 times, so I just decided to share them both. Honestly, the gold one felt too simple, but I know how long it took me to make! Which one do you like better?
Thank you for stopping by my blog – I appreciate you! Give yourself permission to take care of yourself today and spend time doing what fills your heart! Wen your heart is full, there is more to give to others!
Altenew products used:
Altenew Blooming Flower Bed Builder Stencil Set
Altenew Bad Days Happen Stamp Set
Altenew Crisp Dye Ink – Warm Sunshine, Coral Bliss
Altenew Fresh Dye Ink – Dew Drops
Also used:
Sizzix Tim Holtz Thinlits – Garden Greens
Ranger Distress Texture Paste – Black Opaque
Ranger Distress Oxide Ink – Black Soot
