

Hello fellow paper lovers! Today I’m sharing a card I made while playing with some fabulous new (to me) ink pads by Maker Forte, all of which are available here at ScrappyShak! Not to be overly dramatic, but I really love these ink pads! I have been considering adding a new set of ink pads to my craftroom, and I think I’ve found just what I was looking for with the Maker Forte ink pads. These pads are so inky, and the colors are vibrant and crisp. They are dye based, so they clean up easily with water. Full disclosure: the red stained my fingernails, but I shouldn’t have gotten so messy! Since getting back into cardmaking after a 15 year (or so) hiatus, I have been focusing on collecting the Tim Holtz Distress inks and oxides. But occassionally, I want something that is not “distressed”. As I prepare to get ready for Christmas card making, I wanted to decide upon a new ink line to have on hand. Coincidentally, ScrappyShak just started carrying the full line of Maker Forte Color Hive ink pads. It’s a match made in crafty heaven for me! They are also the same width as the Distress ink pads, so they’ll fit nicely into my homemade storage shelves! I started with the basics: red (Telephone Box), yellow (English Mustard), and blue (Blue Raspberry), and added a pine green (Everglades), orangy red (Grand Canyon) and a neutral (Frappe). Of course I can blend the 3 primary colors to get the secondary colors, and that’s what I did here.
I had no idea where I was going to go with this, but I knew I wanted to blend some fall colors. I started with watercolor paper, and started blending with the Telephone Box red using a foam applicator and blending tool. Maybe I was too heavy handed, or maybe that’s just not the right tool to use with these ink silicone ink pads, because there was SO MUCH INK! The more I tried to blend it out, the more the watercolor paper just sucked it up! I was never going to get it to blend into orange by adding yellow, so I set that aside, and switched to plan B. I used Neenah Classic Crest Solar White 110lb cardstock, and a blending brush. More importantly, I started with a really light application of ink, and then added a little at a time. For me, I found the blending brushes much easier to use with these ink pads. If you only have the foam applicators, I would suggest to just start with a very light application of ink onto the foam, and do more layers until you reach the coverage that you desire. I mostly used the blending brushes now with all of my Distress ink, but still use the foam at times, like for adding shadows to edges of backgrounds or dies.
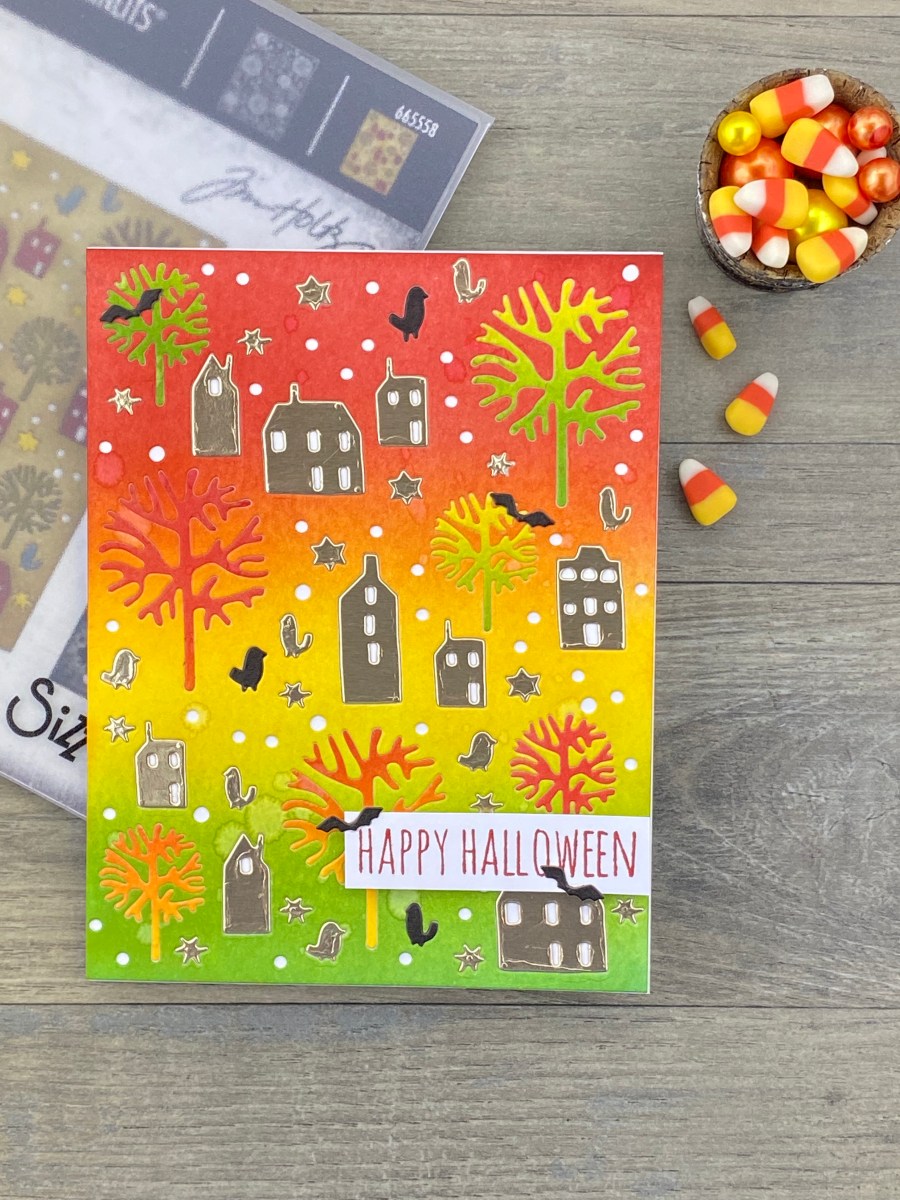
Here I show blending the red, blue, and then adding yellow to make orange and green. This ink is also water reactive, and I decided to spritz my background with a bit of water. I kind of wish I hadn’t, because I don’t really like the splotches on the finished card. But that was before I had really figured out what the finished card would be!


As the ink dried, the colors appeared to blend into each other better. Now that I had this beautiful background, I looked through my dies to see what I had that was kind of fall-like. I picked the Tim Holtz Sizzix Countryside Die that I had just picked up on clearance. The Countryside die is the same size as an A2 cardfront. There are lots of other dies out there that you could use instead. Nordic Winter by Tim Holtz is similar. The new Tim Holtz Layered Plaid would be fun to try, or the Sizzix Botanic Scene by Lisa Jones. There are other Tim Holtz dies that are A2 sized, like Leafy Twigs, Arctic, Bouquet, Doodle Art #1 and #2, and Folk Flowers.
I ran the Countryside die through my die cutting machine with my blended background. Before I poked out all of the pieces, I thought about leaving some in place, like maybe the trees. While I was poking out the houses, I realized some of them looked the same. I put them back in a different place, and thought it looked pretty cool. I wonder if the trees work like that? Yes, they do! So I poked out the trees, and then popped them back in to a different spot. How cool is that?!?! Moving them around made them appear to stay more in the background, but definitely let them stand out and be seen as trees. Now I’m having fun!
Before I started gluing the pieces in, I glued the background onto a piece of white cardstock, so I could start gluing in the pieces. I decided to leave the little circle holes empty, showing the white cardstock that I mounted the background on. You could of course use a color if you prefer to not piece back in some of the cutouts, like the birds or the stars.

I figured the houses should stand out a little more than the trees, but I didn’t want to add another color, so I went with gold metallic paper, to go with the warmer fall colors. I punched the windows and doors out of the houses, so the white behind would show through as well. As I was piecing everything back in to the background, in the gold, I was thinking of making the card more Halloween-y, and thinking of adding bats.
That gave me the idea to make some of the birds into black crows. Crows are creepy, in my opinion. I cut out the die again with black paper. I had to use my embellishment wand to pick up the tiny pieces and fit them into the background. I also used my Bearly Arts glue, with the precision tip, which has become my favorite glue.
The sentiment is from an acrylic Tim Holtz set I got at Joann Fabrics. It’s the one with the pumpkins from a few years back. I loved how the Telephone Box Maker Forte ink stamped so crisp and clean with just one impression. I attached the sentiment to the card with foam mounting squares, and used a couple more tiny bats to embellish it. I mounted the front panel onto an A2 card base made with Neenah Solar White cardstock.
I hope you like my Halloween card. This design can also be used for a fall card, minus the bats maybe. It was so fun to put together. I am definitely using a similar design to make some Christmas cards this year, probably with different, more wintery colors, but definitely with the Maker Forte ink pads! Thanks for stopping by my blog! Have a happy, crafty day!
Products used, available at ScrappyShak:
Maker Forte Color Hive ink pads (Telephone Box, English Mustard, Blue Raspberry)
Blending tool with foam
Idea-ology Kraft Stack cardstock paper – Metallic Classics
Also used:
Blending brushes
Tim Holtz Gate Keeper dies (bats)
Neenah Classic Crest Solar White 110lb cardstock
