ScrapbookPal Design Team: Honey Bee Sweet Season Mugs

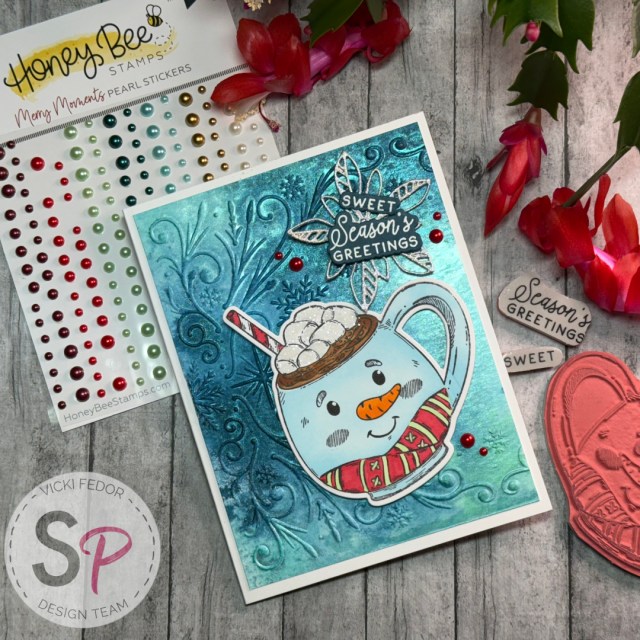
Hello ScrapbookPal friends! I don’t know about your neck of the woods, but it sure is getting chilly here in Northern Virginia! When I saw this set of adorable character mugs from Honey Bee Stamps, I could almost taste the homemade hot chocolate that my mother would have ready for us after sledding! Back then, I’d have to share with my sister and friends. Today, I decided to pick my one favorite design and make a (paper) cup of hot cocoa just for myself! Honey Bee – Cling Stamps – Sweet Season Mugs is a fabulous stamp set that includes four fun mugs (Santa, reindeer, snowman and gingerbread man) and several sentiments. I love that Honey Bee uses real red rubber to make their stamps, ensuring that they will last for years to come. In my experience, they are a much better investment than the clear photopolymer cling sets. All of that stamps have coordinating dies in the Honey Bee – Honey Cuts – Sweet Season Mugs set. On a whim, I decided to splurge and get the Honey Bee Stamps – Pearl Stickers – Merry Moments because I was drawn to the colors. I ended up using the pearls to select my colors for this card (had to add the orange nose!)

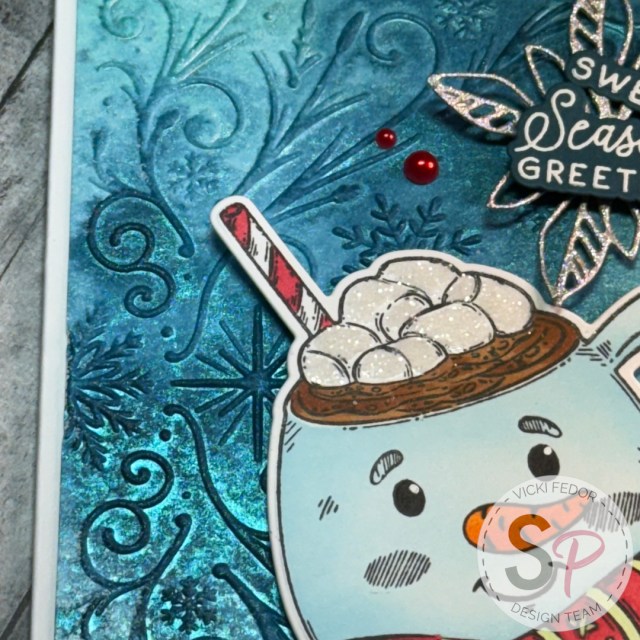
For my snowman mug, I didn’t want to just leave him white… I thought that might be too much white with the white marshmallows on top. I am not ashamed to say that my Copic Marker skills are still in the beginner category – okay for some small details, but probably not the best to show off on the focal point of my card. After I used my Copic Sketch Markers (YR04, YR16, R35, YG11, E35, E37) to color in the details of the mug, I hemmed and hawed about messing up the rest of the mug by trying to blend Copics. I had an idea to mask off all the parts that I had just colored, and use a blending brush and a lighthanded application of Ranger Tim Holtz Distress Ink in Tumbled Glass. It looks a little darker in the photo, but it really is a nice light shade of blue in person.

I also added a bit of clear glitter to the marshmallows – because – it’s the holidays! More glitter always! Now that my focal point was finished, I went on to the background of my card. I had also purchased the Honey Bee Stamps – 3D Embossing Folder – Frosted Filigree. This folder is soooo pretty and detailed. It’s a nice 5×7 size folder, but I wanted to stick to a smaller, A2 sized card. I realized that if I turned the folder sideways, I could get a 5 1/4 inch by 4 inch piece for the background with just a tiny 1/8 inch frame of the base card color. Still thinking glitter and sparkles, I reached for my Ranger Tim Holtz Mica Spray Stain swatches. When I purchased mine several years ago, they came in seasonal sets of 3 different sprays. Now, ScrapbookPal sells them individually! And, at the typing of this post, they are ON SALE! I again went to the Honey Bee Stamps – Pearl Stickers – Merry Moments for color inspiration, and chose the Distress Mica Spray Stains in Frosty Mint, Wonderland, and Juniper Berry I highly suggest making swatches of all of your sprays, especially the mica ones that look different when they are settled out on your shelf than they do after you shake them up and spray them. I never used to use my Mica sprays until I swatched them!

I used a piece of watercolor paper, spritzed it lightly with water on both sides, and ran it through the embossing folder first. Then I used the mica sprays, randomly spritzing 2 squirts of each of the lighter colors, and 3 squirts of the darker Juniper Berry color. To get the colors to blend, I spritzed lightly with water again. Then I just walked away! I couldn’t believe how beautiful it was when I returned and it was mostly dry! I couldn’t have planned it any better if I tried! The raised swirly bits and snowflakes seemed to hold a darker concentration of the color, and really stood out beautifully. I had thought that I would have to add some ink on top for definition, but honestly didn’t want to do anything more and end up messing it up! I finished drying it completely with my heat tool, but you could also just wait and let it air dry.

The greetings (I love the tiny little “sweet” stamp!) were stamped in VersaMark embossing ink and dusted with white embossing powder before being heat set. I wanted to give the greetings a landing space on the card. I tried a few things, and then decided a snowflake die would be great. I couldn’t find one that was the right size in my stash, but I did find this poinsettia cutout from Sizzix – Tim Holtz – Thinlits Dies – Vault Seasonal Sketch. I used a glittery paper to diecut my “snowflake” wannabe.

The last step was to use Scrapbook Adhesives Foam Squares Variety Pack and Scrapbook Adhesives Thin Foam Squares Variety Pack, and Bearly Art Precision Craft Glue to attach everything to my A2 white cardbase, and add the Honey Bee Stamps – Pearl Stickers – Merry Moments.

Thank you for visiting my blog. I know through first had experience that the thought of going through the holidays without a special loved one can be overwhelming. I try to find joy in little things like cardmaking, time with friends and family, and random acts of kindness. Please ask for help if you need it. Have a blessed season, however you choose to celebrate. My supplies are listed below, and available at ScrapbookPal.com!

Products used in this project, available at ScrapbookPal.com:
Honey Bee – Cling Stamps – Sweet Season Mugs
Honey Bee – Honey Cuts – Sweet Season Mugs
Honey Bee Stamps – 3D Embossing Folder – Frosted Filigree
Honey Bee Stamps – Pearl Stickers – Merry Moments
Sizzix – Tim Holtz – Thinlits Dies – Vault Seasonal Sketch
Ranger Tim Holtz Distress Ink Pad – Tumbled Glass
Ranger Tim Holtz Distress Mica Stain – Frosty Mint, Wonderland, Juniper Berry
Tsukineko – VersaFine Ink Pad – Onyx Black
Tsukineko – VersaMark Watermark – Stamp Pad
Gina K. Designs – Embossing Powder – Detail White
Spellbinders Mini Blending Brush Set
Ranger Ink – Glossy Accents
Lawn Fawn – Glitter – Prisma
Bearly Art Precision Craft Glue – The Bundle (with precision tip)
Scrapbook Adhesives Foam Squares Variety Pack
Scrapbook Adhesives Thin Foam Squares Variety Pack
Copic Sketch Markers – YR04, YR16, R35, YG11, E35, E37

ScrapbookPal Design Team: Spellbinders Pasta Friends

Hello ScrapbookPal friends! I’m so very happy to be back as part of the Design Team! I love sharing my cards in hopes to teach and inspire others, but most of all, I love the challenge that it brings to me! I can honestly say that I’ve never walked into my craft studio and said “I think I’ll make a fun, punny pasta card today!”. But here we are! And wouldn’t you know that Spellbinders has released a beautifully coordinated collection of products for all of us carb lovers out there! I used the Spellbinders – Buon Appetito Collection – 3D Embossing Folder – Al Dente, Spellbinders – Buon Appetito Collection – Dies – Pasta Friends, and the Spellbinders – Buon Appetito Collection – Clear Stamps – Stay Saucy. There is one more die set in the collection to add to the fun, the Spellbinders – Buon Appetito Collection – Dies – Ingredients Buddies! That die set includes a tomato, a clove of garlic, a meatball with sauce, and a cheese wedge, all as adorable as the Pasta Friends!

As I was contemplating my design, I decided I wanted the pasta shapes on the Spellbinders Al Dente folder to be more of a pasta color, and the background to be darker. To achieve this effect, I planned on inking the flat side of the embossing folder… the side where the shapes are depressed into the folder. This would place the ink on the background, and keep the pasta shapes the color of the paper. At first I tried this using cream colored cardstock, and inking with Tim Holtz Distress Oxide in Antique Linen. As I thought through the design, I decided I would rather have my little ravioli pasta friends be a pasta color, and have the entire background appearing to be tinged with marinara. Not to worry, I’ll use that first “practice” piece of cardstock for something else. On to the next idea… let’s get some variations in the marinara sauce. Starting with a piece of white cardstock, I used a large blending brush to apply Tim Holtz Distress Ink in Tattered Rose and Fired Brick. Then I inked the embossing folder with Aged Mahogany, and ran it through my die cut machine.

Next up was to create my main characters, filled with ricotta of course. Paper ricotta. I cut the ravioli shapes using the Spellbinders Pasta Friends dies. I cut two layers of the smaller “face” part, as I wanted that part to appear thicker. I used a blush Copic Marker, number R20, to color a small scrap piece of cardstock for the cheeks and mouth, and layered that inside my “pasta”. I inked my raviolis with the Distress Oxide Antique Linen, and used a touch of Distress Tea Dye ink to add depth the the edges.

I used my favorite black cardstock from Ranger/Tim Holtz for the arms, legs, and bow tie of my ravioli. I colored another bow with Aged Mahogany, and then used Ranger Ink Glossy Accents to make it shine. I used more of the dies to cut out leaves, the olive, and the chef hat from white paper. The leaves and olive were colored with the green Distress Inks listed below. The Spellbinders Mini Blending Brush Set is fantastic for inking small dies lkike the leaves and the olive, and you get three different sized brushes in the set, at a great price. I used a piece of scrap silver paper for the fork.

To add a little more interest to the card, I went back to that first piece of cream colored cardstock that I had embossed in the beginning but decided not to use. Some of the Italian words in the sentiment set were small enough to fit on the embossed ravioli pasta shapes. I stamped them onto the spare background that I made, and then fussy cut them out to add to the card. The raviolis and sentiment strip were attached to the card front using Scrapbook Adhesives Foam Squares Variety Pack and Scrapbook Adhesives Thin Foam Squares Variety Pack. I used Bearly Art Precision Craft Glue to add the arms, legs, hat, and other details. I created a thin black frame with black cardstock, and used Fired Brick ink to color the larger, red frame.

Thank you for reading my blog post. I hope you like this card and are inspired enough to step away from your Christmas Card Production Line and create a fun card to send to your favorite Italian! All of the supplies are listed below, and available at ScrapbookPal.com!

Products used in this project, available at ScrapbookPal.com:
Spellbinders – Buon Appetito Collection – 3D Embossing Folder – Al Dente
Spellbinders – Buon Appetito Collection – Dies – Pasta Friends
Spellbinders – Buon Appetito Collection – Clear Stamps – Stay Saucy
Ranger Tim Holtz Distress Oxide Ink Pad – Antique Linen
Ranger Tim Holtz Distress Ink Pad – Tattered Rose, Fired Brick, Aged Mahogany, Tea Dye, Shabby Shutters, Crushed Olive, Forest Moss
Tsukineko – VersaFine Ink Pad – Onyx Black
Ranger Mini Ink Blending Tool
Spellbinders Mini Blending Brush Set
Ranger Ink Tim Holtz Alcohol Ink Cardstock Black Matte
Ranger Ink – Glossy Accents
Bearly Art Precision Craft Glue – The Bundle (with precision tip)
Scrapbook Adhesives Foam Squares Variety Pack
Scrapbook Adhesives Thin Foam Squares Variety Pack
Copic – Sketch Marker – Blush – R20

ScrappyShak Design Team: Happy Birthday Shaker

Hey paper people! Here’s another shaker card I made using the super simple Sizzix Shaker Panes with coordinating framelit circle dies. You can read my previous post to see more details on how easily these shaker cards go together. Here I used Altenew Square Weave stencil and Spellbinder’s Simply Perfect Layered Blooms dies to add some interest. By the way, these dies are currently on sale at ScrappyShak.com! The stamp is from Stampabilities. The challenge I had with this card was trying to use the acrylic circle that comes with the Sizzix Shaker Panes.

The package insert states that the shaker pane cover is heat resistent, so you are able to stamp on it, use embossing powder, and melt the powder. I had to foresight to do a test run on a sheet of clear acetate that I had in my stash. If you try this, be careful not to apply too much heat, as the acetate will warp and melt, unlike the piece that’s included with the shaker pane kit. I first had a problem trying to get good coverage of ink that would take the embossing powder. I tried using Memento, and then Versafine black ink pads. I like to stamp in black and then emboss in clear. That way, if there is any stray embossing powder, you don’t really see it. I usually do this, rather than stamping in clear embossing ink (like VersaMark) and using black embossing powder. It usually works great on paper. Also, to add complexity to the task, the image that I wanted to use was on a wood mounted rubber stamp. I’ve really gotten used to using a stamping platform (Misti) where you can stamp again if you miss a spot. With a wood block, you only get one chance at a perfect stamping!

Next I tried StayzOn black ink with detail black embossing powder. I used my embossing powder duster first to make sure the embossing powder didn’t cling where it wasn’t supposed to. This is my favorite smelling ink pad for sure! It is an older pad, and I didn’t have a reinker, so the image was too light and dried too fast to get the embossing powder to stick. I then tried VersaMark embossing ink with detail black embossing powder. This gave me the best results in my test run. I was ready to try it on the one piece that comes with the shaker panes. It came out okay, but I am the ultimate perfectionist! I made sure my ink pad was refilled, and nice and juicy… maybe too juicy. The image was a little blurred. I’ll warn you that I find stamping on acetate or anything shiny reminds me of trying to sew slippery fabric. It will move. It’s inevitable! Don’t expect perfection! But do your best to expect movement when you’re stamping liquid ink onto a slippery paper. Use a stamping platform if you can. Be deliberate with your stamping. Make sure your stamp has good ink coverage, but not too much, before you stamp.

The Happy Birthday shaker pane cover was pretty good, so I was going to use it. When I put some sequins in the shaker, I decided that you couldn’t really see the impecfections, but also, you couldn’t really see the sentiment anymore! I changed my mind about my design. I got a piece of white cardstock, stamped in black Versafine ink, embossed in detail clear embossing power, and put it behind the shaker pane. That’s better! That looks good to me!

I turned this quick shaker card, made incredibly easy by the Sizzix Shaker Panes, into a long, drawn out learning experience! But hey, that’s what it’s about some times. You need to experiment to see what works for you, in your environment, with your products. I’ll definitely pick up a StayzOn reinker, and more clear acetate to practice on. I also will get some cling stamp backing foam so I can replace the wood block for this stamp, and turn it into a cling stamp. This will let me use it with my Misti stamping platform.

Thanks for stopping by my blog. Stay crafty!

Scrappy Shak products used:
Spellbinders Simply Perfect Layered Blooms
Sizzix Shaker Panes – Circle
Sizzix Framelits Circle Frames