

Hello creative friends! Today I’m sharing a card that I made after participating in Altenew Academy’s Creative Watercolor Media online course. This was a fun class, because 3 of my favorite instructors teamed up together for this one: Laura Bassen, Jennifer Rzasa, and Debby Hughes. They each shared 2 cards, and several different techniques for achieving watercolor effects.
I was inspired by a card that Laura made. It was a loose watercolor floral panel. She used reinkers as watercolor paints. I don’t have many reinkers, and definitely not in a coordinating color scheme, so I used my Ranger Distress Mica Stain Sprays instead. I also used the suggestion of using plain clear water to help the inks blend better, and made sure to work the inks while everything was still wet. I tried really hard to “let the perfectionist side of you take a back seat”. I’ll definitely have to practice that suggestion, but I’m pretty happy with my final card.
I started with a half sheet (6 x 9) of Canson watercolor paper, the pad with the blue cover. I believe it’s hot press, so relatively smooth for stamping. Laura recommended starting with a big piece of paper, and actually got two A2 sized panels out of her sheet of watercolor paper. I was struggling with the technique a little, and didn’t finish my panel. I also prefer to work on more manageable sizes of paper, rather than a big piece. As I was applying the inks, I felt that I hadn’t stamped the flowers close enough together, and was going to scrap this attempt and start over. In the end, I ended up cropping down my panel to one A2 sized section I was happy with. Before I get too far, let me go back to the beginning…
I chose the Beautiful Day Stamp Set to work with, because I liked the size and detail of the large flower outline stamp. I thought it had some nice open space to apply the watercolors. I used Versamark embossing ink, and embossed with clear embossing powder. I also used a sprig and leaf cluster from the same set. I stamped an image, added embossing powder so I could see what I had just stamped, and moved on to another image. When I was done with the panel, I heat set the entire piece all at once. You need to be careful not to knock off any powder before you heat set it. Once that was done, I selected 5 different coordinating mica stain sprays for the flowers, and 2 greens for the leaves. I sprayed three or four pumps of each stain into a different disposable portion cup (like from a takeout food order). You can use a palette if you have one. The cool thing about these water-based mica stain sprays is that they dried up in the portion cups overnight, and all I had to do was add water to be able to use them again the next day. I’d imagine any water based spray would work the same.
I used the technique introduced in the class where you apply water to the image first, and then dab on the watercolor ink or paint, letting it move and blend with the water. Instead of misting the images with a mini mister as Laura did, I used a clear paint brush. This let me control where the water went, and therefore also where the ink went. My piece ended up not as loose as the background that Laura created in the class. I tried to let myself go a little more outside the lines with the leaf cluster on the far right below, but I didn’t like it as much. That’s when I stopped, and decided to take a break and come back after it dried, with less self-judgment in my eyes! To fill in some of the white space between the flowers, I spattered the pink mica spray over the entire piece, and let dry.

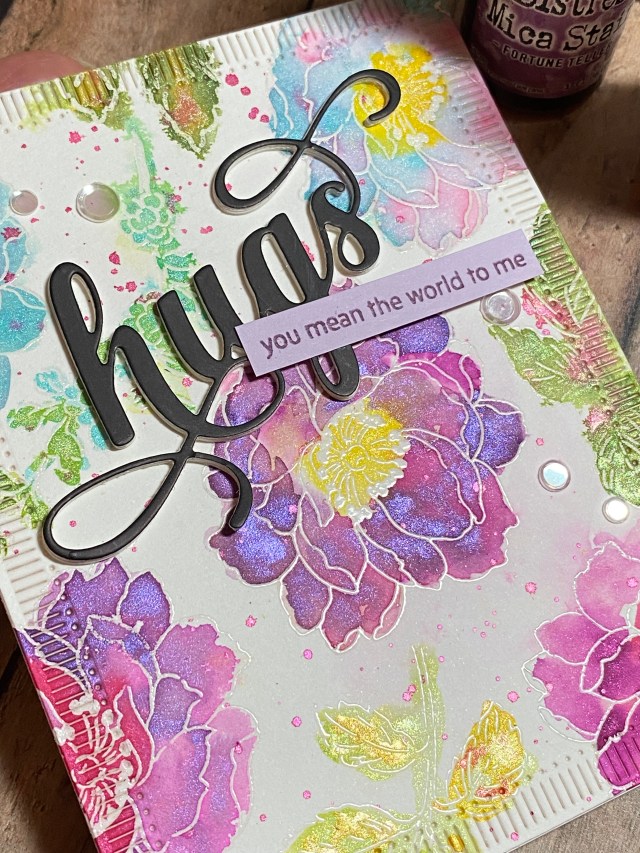
I wanted a subtle border on the final card. I used Spellbinders Fluted Classics Rectangles dies to cut an A2 sized panel from my background. I like how this die finished off the edge of the card, but didn’t detract from the beautiful colors of the mica sprays. I considered creating a border with cardstock (black, white, silver, or lavender), but didn’t like it as much as the effect of leaving it with just an etched border for this card. I finished off the card with the Altenew Fancy Hugs die, which I cut from black cardstock, and layered on top of 3 white diecuts for dimension. I also added a sub-sentiment from the Paint-A-Flower: Camelia Waterhouse Outline Stamp Set, and a few clear confetti sequins.
This is a pretty straight forward technique. You can make it as loose or as controlled as you want it to be. If you don’t have mica sprays, maybe you have metallic watercolor paints? Or, try it with some vibrant reinkers. Thank you for stopping by my blog. I appreciate you!
Altenew products used:
Altenew Beautiful Day Stamp Set
Altenew Paint-A-Flower: Camellia Waterhouse
Altenew Fancy Hugs Die
Also used:
Ranger Tim Holtz Distress Mica Stain Sprays – Hocus Pocus, Fortune Teller, Cocktail Party, Shniy Bauble, Harvest Moon, Wicked Elixir, Tree Lot

Absolutely gorgeous!! LOVE the sparkle!
LikeLike