Church of the Outcats

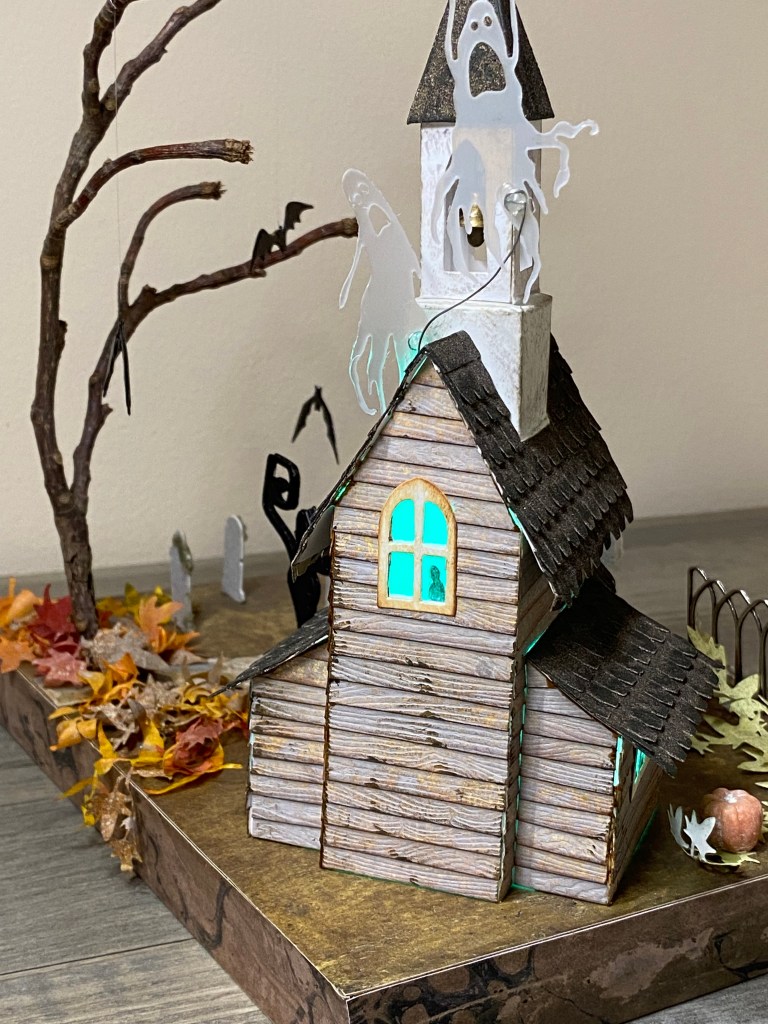
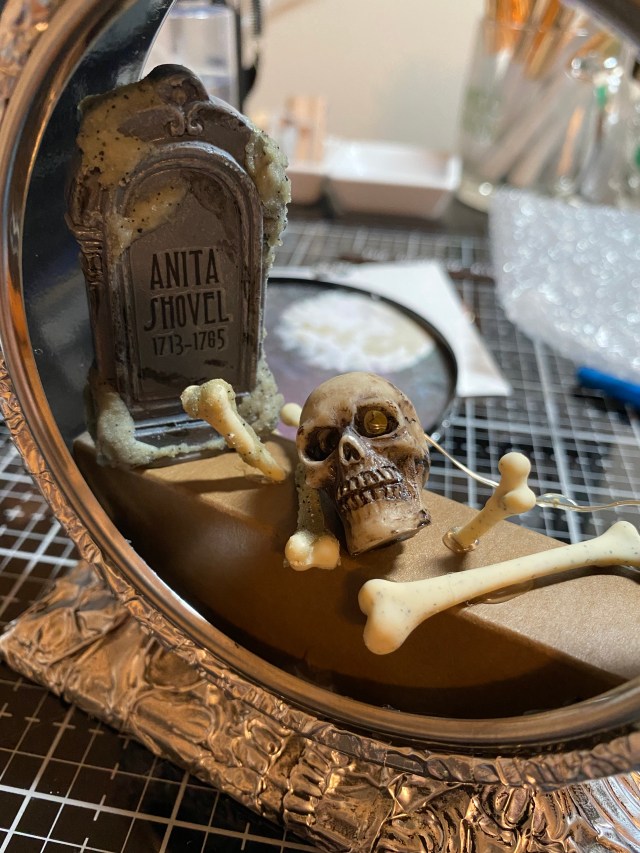
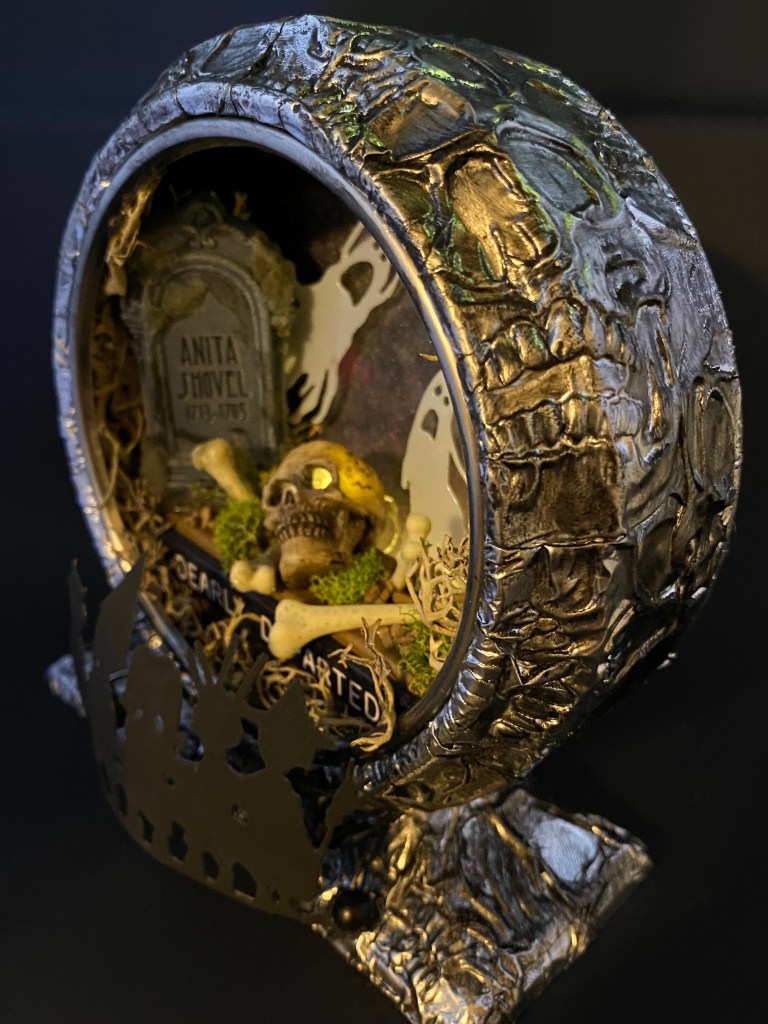
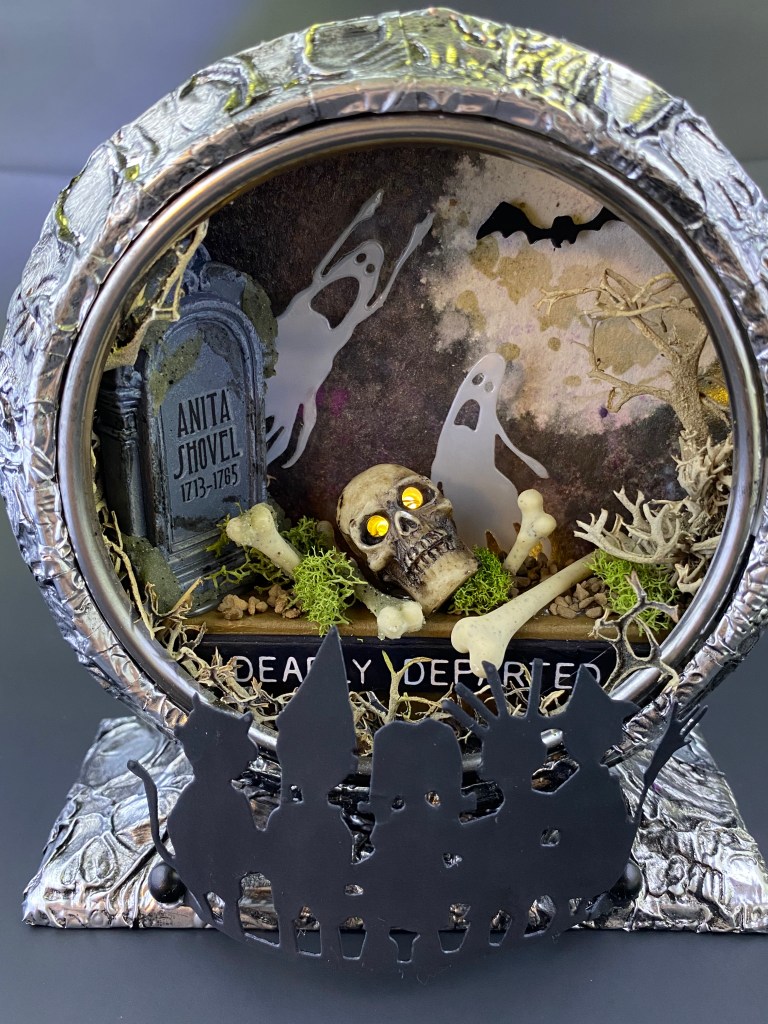
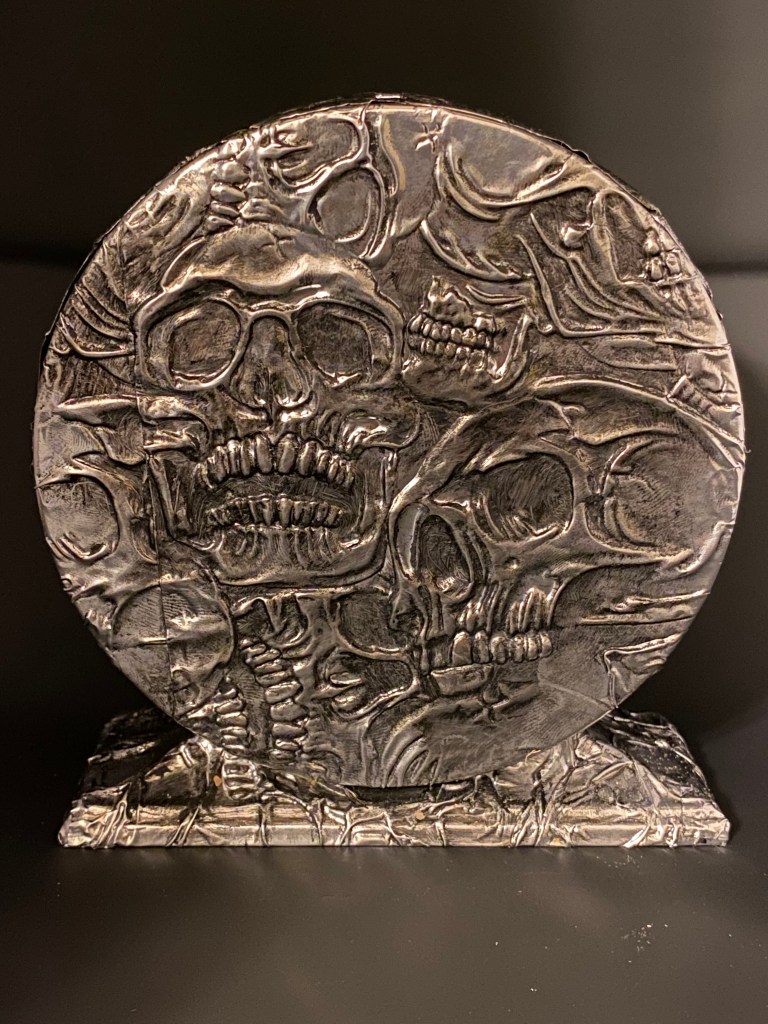
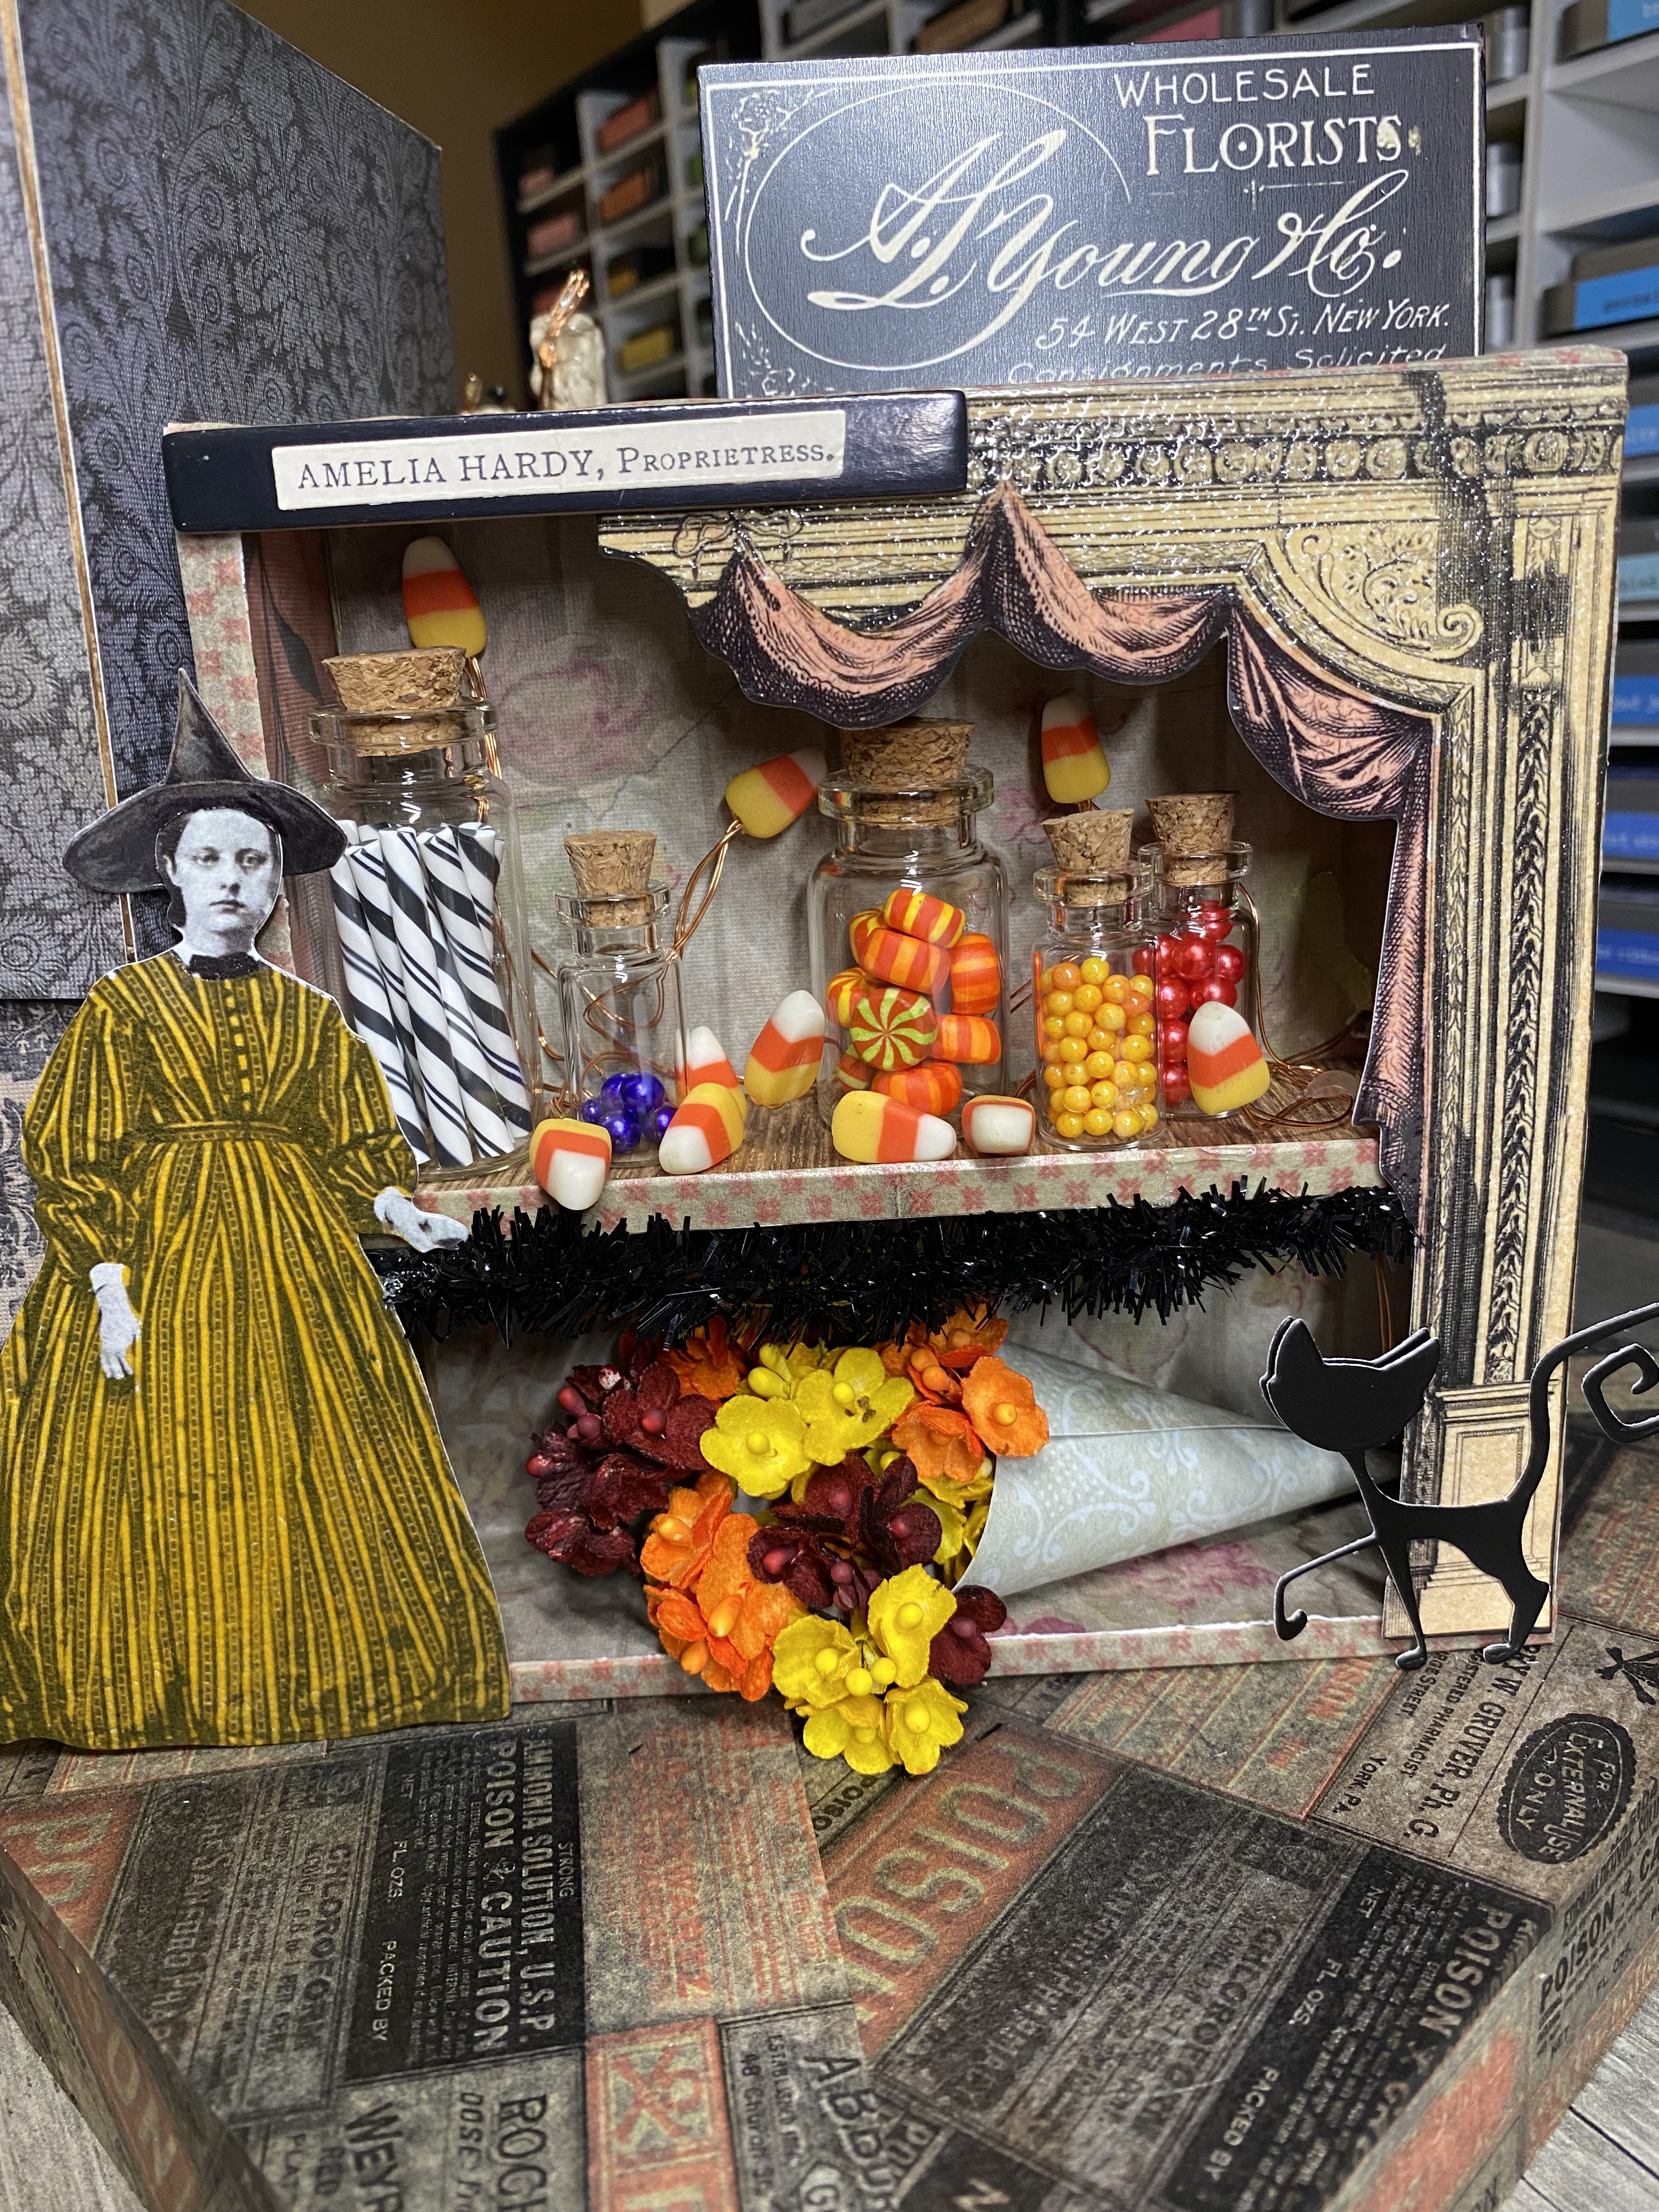
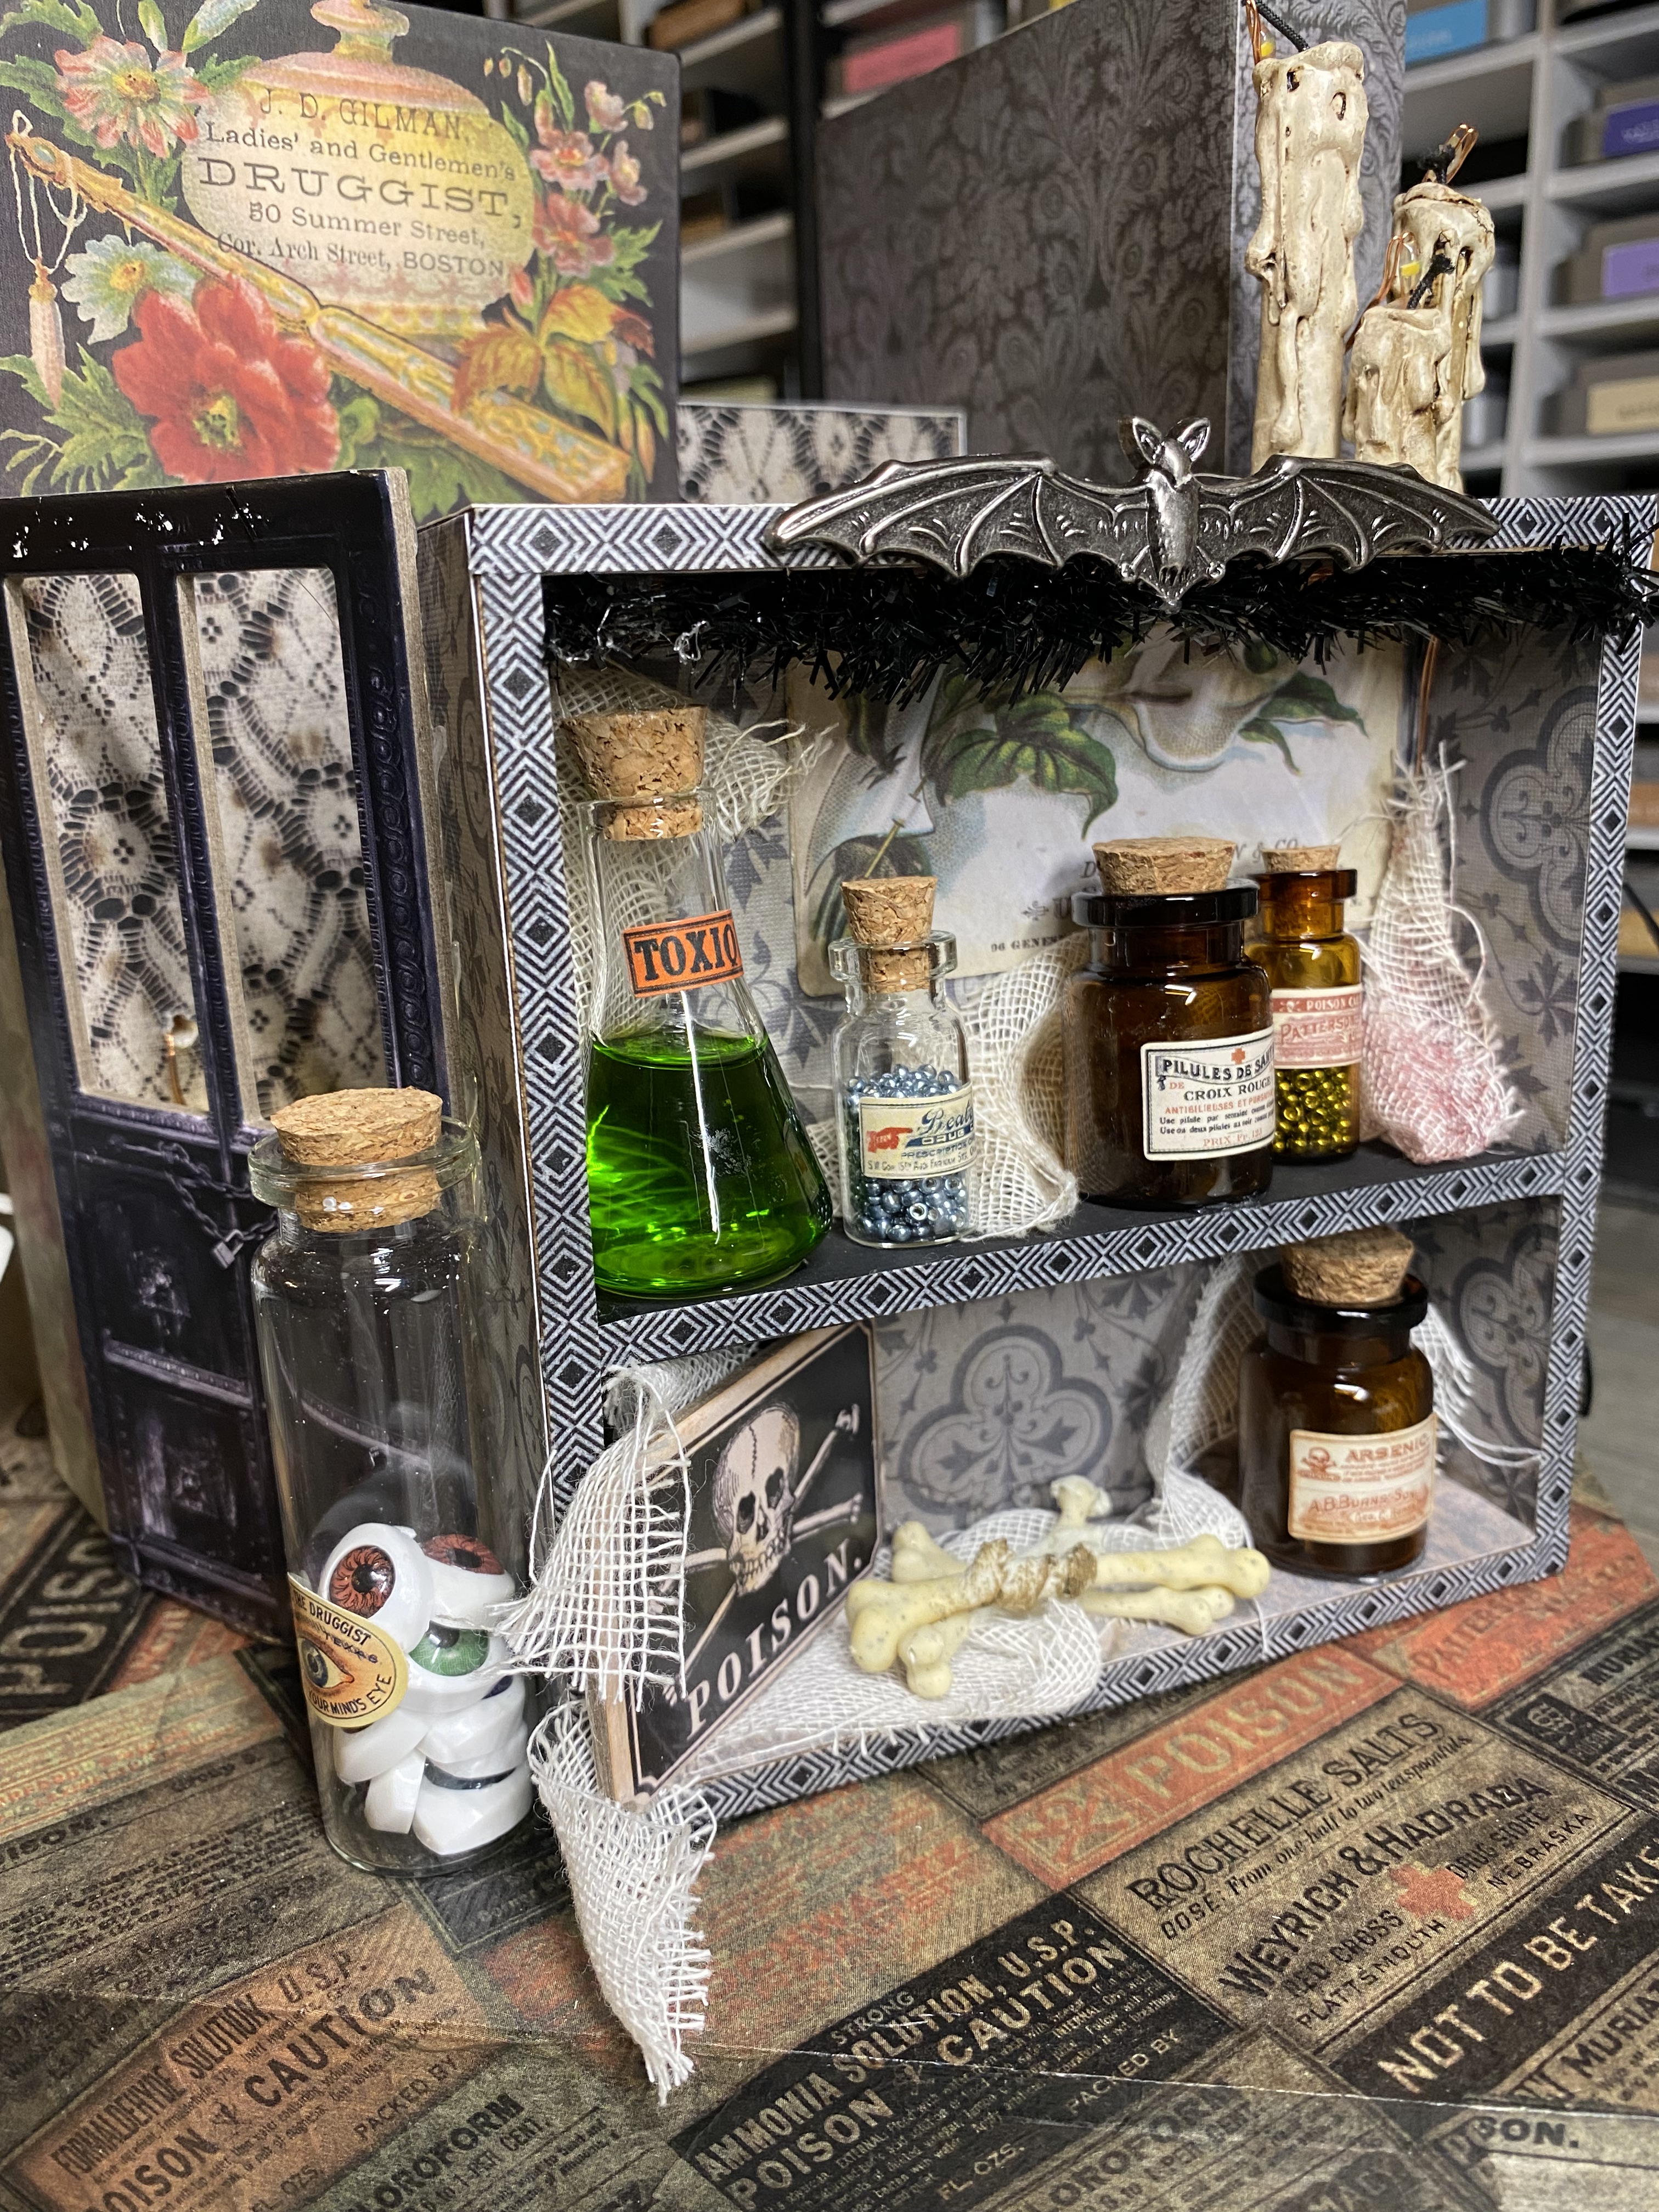
This is a Halloween home decor piece I made mostly just for myself, just because. I love to make paper houses, especially for holidays. I thought about this for a while. I actually put the house together a couple months ago before I decided how to finish up the display. Again, I kind of collected a lot of stuff, and then got an idea, and added more stuff until I got enough stuff that seemed to go together. I never really am comfortable stopping when I’m creating something like this. Today I stopped because it was time to feed the dog, and, I was generally happy with it.

Here’s the story…
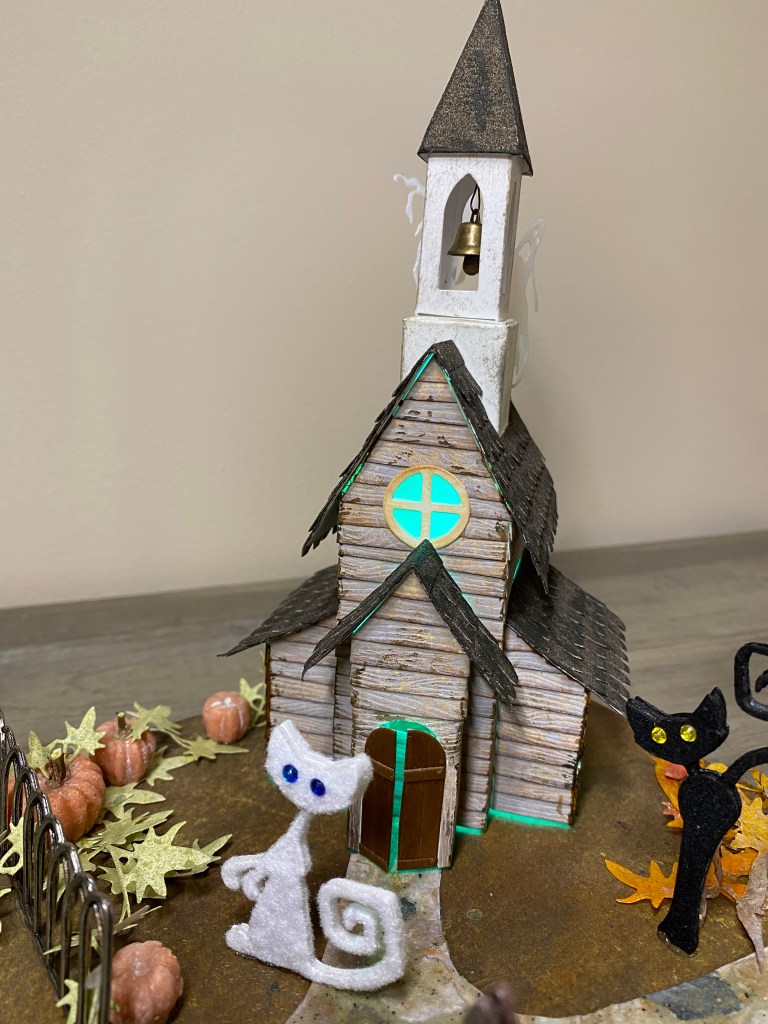
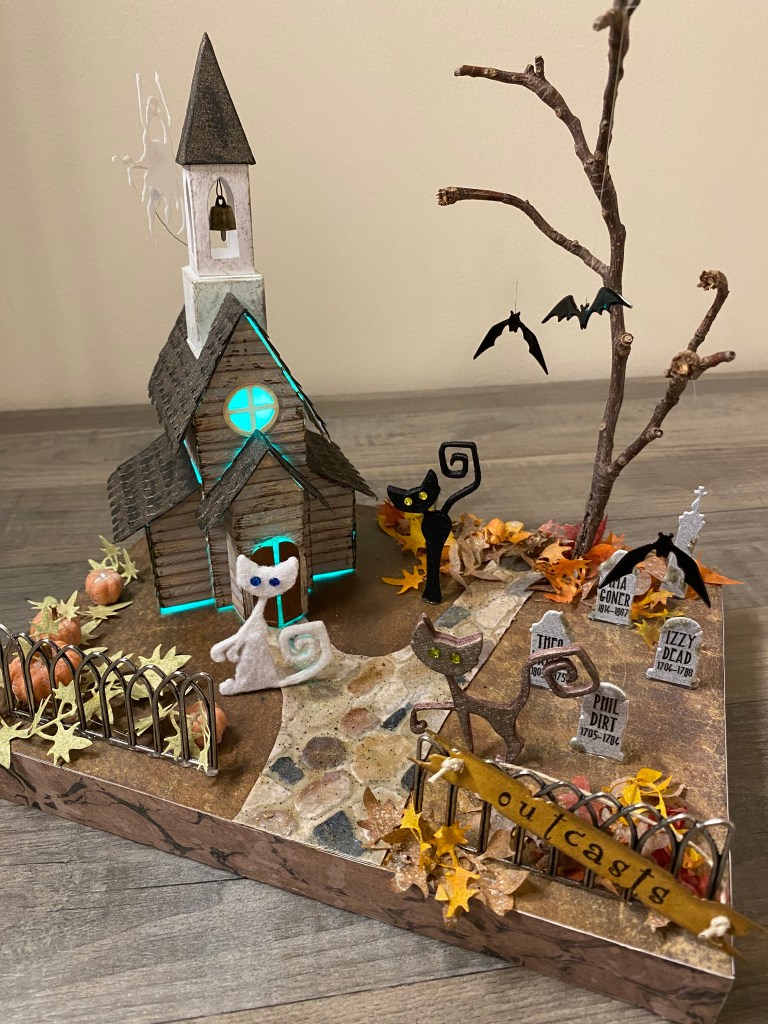
Once upon a time, there was a snooty little town somewhere. The townspeople were very snooty, especially when it came to their church. They didn’t want anyone in their church who looked different, or sounded different, or wore different clothes. So they built another church, for the “outcasts”. Anyone they didn’t want in “their” church were sent to the Church of the Outcasts. Time went on, and the townspeople saw the error of their ways. Everyone was welcomed back into the big church, and everyone was very happy. The Church of the Outcasts was deserted, and fell into disarray. Along came Fluffy, one of the most intelligent cats in the town. She said to her friends, “Look, there’s a sign on that church for the out cats! That’s us!”. “What are out cats?”, said Blacky. Their friend Kitty said “Out cats are just cats that get to go outside and explore, like we do”. So Fluffy, Blacky, and Kitty started attending the Church of the Outcats every Sunday, and they were very happy.

I used:

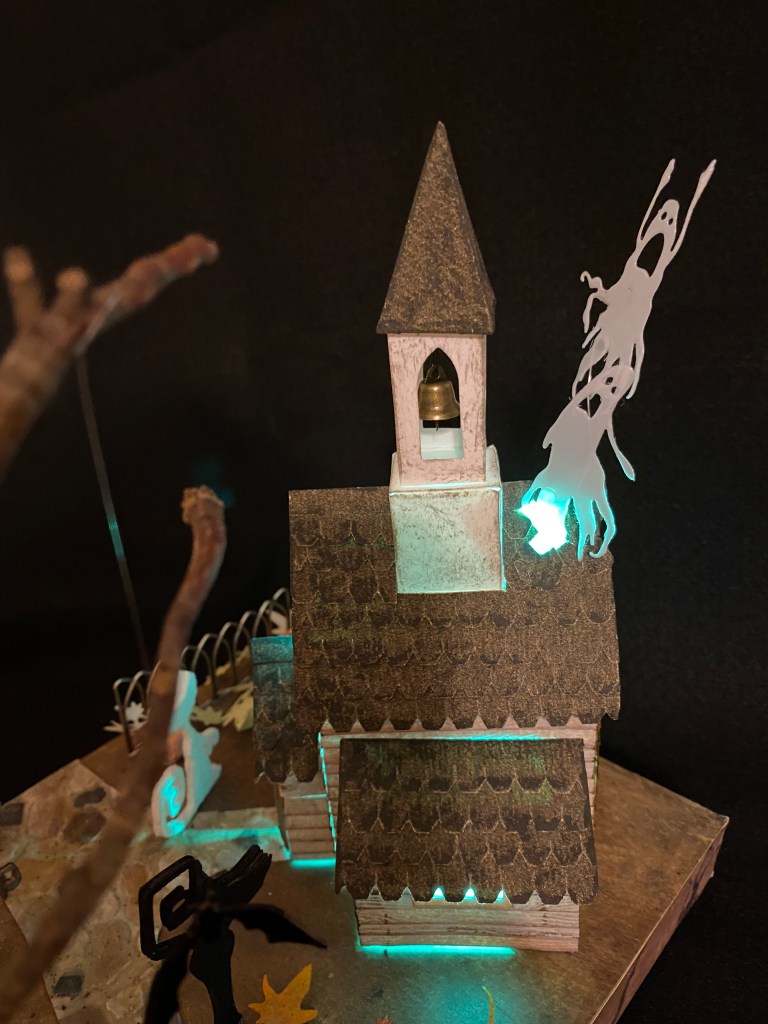
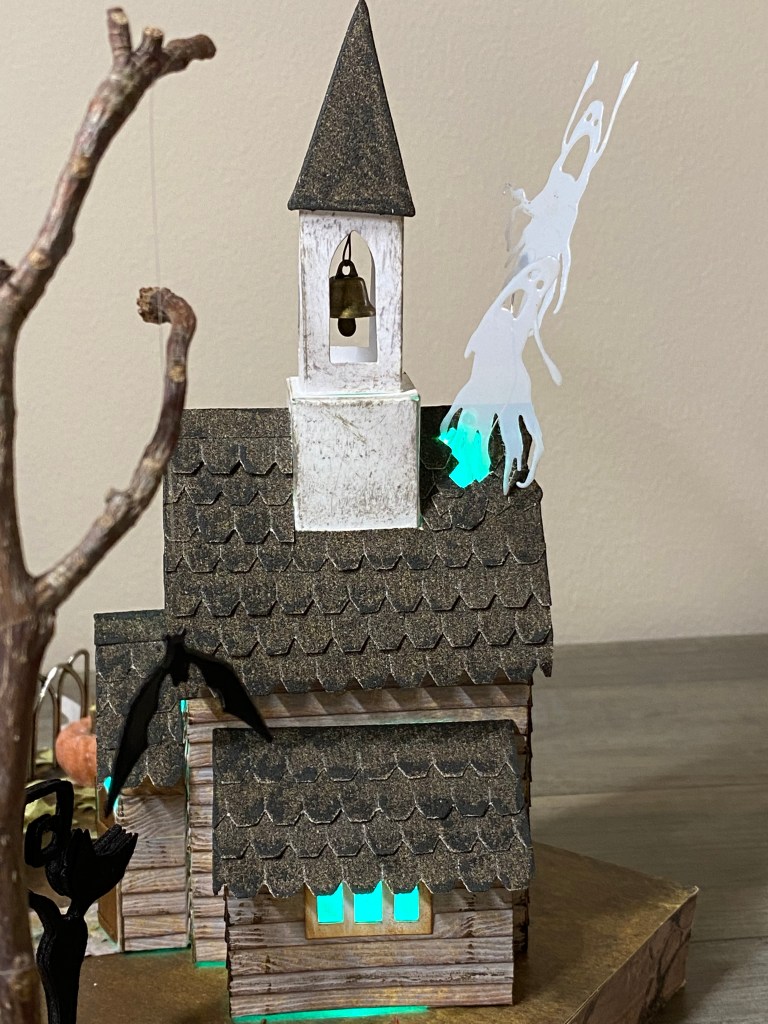
Bigz Village Brownstone, Bell Tower, and Rooftops

Thinlits Garden Greens, Mischievous, Vault Series Halloween 2021, Bat Crazy

Cobblestone embossing folder

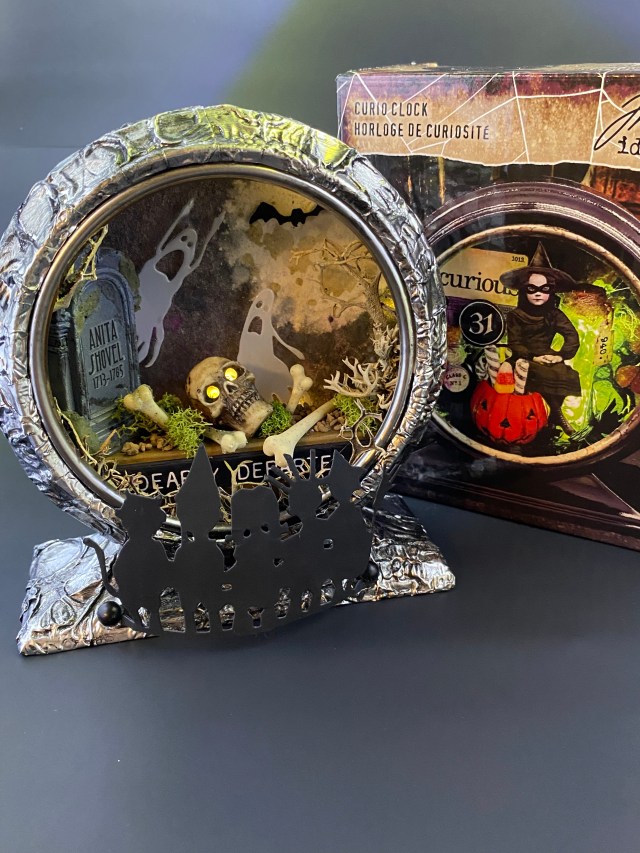
Idea-ology pumpkins, metal gates, backdrops, tiny bell

This projects took me… I don’t know… weeks. I did not take any process photos, because I was really doing this just for fun. I was kind of “in the zone”, especially when making the house, and the walkway.

For the walkway, I didn’t want to have to piece it together. I used one large piece of watercolor paper (9 x 12). My first attempt was using spray stains. First I cut out what looked like a walkway, then embossed it using the Cobblestone folder. I had to get creative to get the whole walkway through my machine. I chose spray stains to color it in browns and greys. While it was the easiest way to color a large piece, I just didn’t like how it turned out. So I tossed it, and started over. This time I used antique linen to give some color to the whole piece, and then used ink pads smooshed on my mat and a waterbrush to add color to each stone. That was much better, but not quite what I wanted. Then I added a thin layer of Crypt Grit Paste over the whole walkway. Perfect!

One thing I did that was different for me is the fall colored leaves. I wanted something to decorate the ground, and I thought of adding leaves. I wanted something light that would look crinkly, like dried leaves. I had a tube of white collage paper, and decided to use that. I cut two pieces, about the size of a half sheet of paper towel, because that’s what I put it on when I’m using spray stains. One piece I colored with fall colors… orange, yellow, red. Another piece I did in browns. When it dried, I decided to spray the back of the collage paper as well to match the colors on the front. To cut out the leaf shapes, I used the Garden Greens die set. Since the collage paper is so thin, kind of like tissue paper, I layered a piece of scrap cardstock under the collage paper when I die cut it.

The Mischievous cats were cut out of different specialty papers. The black cat was a flocked black paper. I layered a piece of fun foam between two diecuts to make the cat thicker so I could get it to stand up. The brownish cat was a woven metallic paper that was in my scrap box. I have no idea where I got that. For the white cat, I used white paper, and then applied white Fun Flock by Stampendous with collage medium.

Add a comment or send me an email if you have any specific questions about this make. I could literally write pages and pages on it! Thanks for stopping by my blog! Have a Happy Halloween!

ScrappyShak Design Team: Halloween Curio Clock

This was so much fun! I was actually overwhelmed with ideas for this… candy, creepy, floral… and then there are those wonderful Mischievous Cat dies this year from Sizzix! I started going through what I had in my Halloween stash, selecting things that I was drawn to. The problem was that my pile of cool stuff was way too big! It was never going to fit inside the curio clock! Then I thought, what could I do that was different? In my last Idea-ology project, I had drilled holes in the candy corn, and put them on the tiny lights. I loved how that turned out. Wouldn’t it be cool to drill holes in the little Idea-ology skulls, to light up their eyes? However, the candy corn is a soft material, and the skulls are a hard resin. I was definitely going to leave this up to the expert (my husband!). I had no expectations at all of his success with this tiny, hard, roundish skull, but he was able to drill the holes for me, using a 1/8 inch drill bit. I was so excited! Of course I had to stick lights in the sockets and test it out right away! The skull with the lights in the eyes became my inspiration!

The curio clock is all ready to go, straight out of the box. The back comes separate, and has to be glued on. The silver ring in the front comes off so you can add color to it separate from the body of the clock if you wish. My first challange was to figure out where I going to hide my tiny light battery pack. How was I going to run the wire inside? I wanted to put the tiny lights underneath the base. There are two small screws, attaching the base to the round clock shell. I decided to use one of the screw holes to run my lights through, leaving the switch and the battery pack under the base. This worked out great. One screw seemed like enough to hold the base on the clock. It’s not like I was going to be tossing it around the family room! The finish on the clock is very nice, in my opinion. You don’t have to cover it up or alter the finish if you don’t want to. They are also coming out with a red one for Christmas. But, I have the Skulls embossing folder, and since I decided to go with the skull theme, I was looking for other things to use. I recalled Tim Holtz had made a heart vignette a few years back, using Alcohol Ink Foil Tape in an embossing folder. I think that’s when I probably bought my foil tape, but never used it. The foil tape is great because it comes adhesive backed already. All you need to do is run it through with the embossing folder, peel and stick!

I covered the base of the clock first, while it was apart. I wanted to add some black to the foil to tone it down. I didn’t have any dark alcohol ink. I thought Tim had used Distress Crayon, so I applied it to the base, and worked it around a bit with a brush. This is where I figured out this should be another step done at the end… the crayon takes a while to cure, so I got it all over myself!

The tape is very flexible, but it does hold its shape farily well. Just be careful not to press down too hard, or you’ll loose the texture of the embossing folder. I cut slits in the tape so I could mold it around the front of the clock. You don’t notice it when the project is done. Then it was time to screw the base to the clock, with the one screw, and string the lights up through the other screw hole. I attached the battery pack underneath the base with a double sided foam square.

During this next part, I kind of got lost in the creative process, and forgot to take pictures! I wanted the focal point of the display to be raised up, so I constructed a curved shelf out of foam board, and covered it with brown kraftstock paper. The shelf is a rectangular piece of foam board, with a front and a back piece made to fit the curve of the curio clock on the bottom, and flat across the top. The text on the tombstone is from Idea-ology Remnant Rubs. I added Crypt Grit Paste, and a little Black Soot crayon. The bones also have Crypt Grit Paste. I used hot glue to attach them. They’re easy to cut with scissors if you want to make them look like they’re coming out of the ground.

Next I created the background scene. I used the technique that Tim demonstrated in his 2022 YouTube live Halloween DIstress launch, using mica sprays and the moon mask. After it dried, I cut it to fit inside of the back panel. I thought it would be cool to have some ghosts hovering about, so this is where I used the Vault Series Halloween 2021 dies. The ghosts were cut out of a piece of frosted acetate. I used foam squares to add them to the back, adding dimension.

I finished arranging the tiny lights so they would light up the skull’s eyes, and then run up the side of the clock where the moon would be. They were secured in place with more foam squares. The ground around the skull and bones was decorated with tiny gravel I found at the craft store with the model train stuff, and dried moss from the floral section. I finished the outside of the back of the clock in the embossed foil tape, and secured the back on with hot glue.

Lastly, I added the baseboard sentiment, and the trick-or-treater onlookers. This turned out really cute, in my opinion, and looks good both with the lights on or off. Give it a try with whatever you have in your craft space! The curio clock is a great vessel to hold anything that makes you smile! It doesn’t have to be idea-ology trinkets, it could be any small collection you have that you want to display. I can also remove the inside display if i want, and try another theme next year (candy corn!).

Thank you for visiting my blog!

Supplies used available at ScrappyShak:
Tim Holtz Curio Clock
Idea-ology Skulls
Idea-ology Boneyard
Idea-ology Tombstones
Idea-ology Remnant Rubs – Halloween
Idea-ology Baseboards – Halloween
Idea-ology droplets – Halloween
Distress Crayons – Black Soot
Distress Grit Paste Crypt
Distress Mica Sprays – Halloween
Alcohol Ink Black cardstock
Tim Holtz DIstress Kraftstock Neutral

Also used:
SIzzix Tim Holtz dies Vault Series: Halloween 2021

ScrappyShak Design Team: Idea-ology Halloween Perspective

Here’s a link to the video on YouTube.

I went “out of the box” for myself on this one, and actually ordered the whole box! I ordered the “I want it all” Halloween Idea-ology August bundle from ScrappyShak! I’ve always admired the other makes from people who seem to have all of the new products, and I wanted to challenge myself to see what I could do if I had all the stuff. I knew I would want to make some kind of lighted holiday display, so I also ordered the square vignette boxes, the vignette display panel, and tiny lights. Other than that, I had no idea what I was going to do.

When my box arrived and I opened it up, I was totally overwhelmed! What have I done?!? I walked away for a bit… When I came back, I just started going through all of the packages, and picking out things that I liked. It seemed like I had 3 different themes going on… candy, bones/potions, and bats/spiders. I started playing with my vignette boxes, and came up with a three sided design that I would attached to the upside down display panel, using it as a base. I made a template so I could remember where I wanted the boxes, but didn’t attached them to the display panel yet. I covered each square with worn wallpaper, and covered the base with collage paper that I had from last year. I liked the darker colors in the paper from last year better for this project.

As I started to gather more stuff for each of my themes, I thought it would be great to have an extra shelf in each vignette box. For the first one, I cut down a piece of wood that had come with a different vignette tray with removable dividers that I used on another project last year. I only had one of those extra pieces, and being slightly lazy and not-so-slightly stubborn as I am, I cut it down with a pair of wire snips, and kinda made a mess! But it worked. For the second shelf, I found a piece of black foam board that I cut down much more easily with scissors and an X-Acto knife. I’d certainly recommend that route. The shelf doesn’t have to be super sturdy just to hold small items. I used hotglue to glue them in to the vignette boxes, then used the thinnest design tape to cover up the edges all the way around the box fronts.

I began by picking out more pieces that I liked, and playing. I had a pile for each “side” of my project. I started with the fun stuff, like finding things to color with alcohol inks that would look like candy, to go in some of the clear glass vials I had. I also used some colored seed beads I had. Then I got distracted with the laboratory beaker. What can I put in there? It should be green. I know people use resin, and I didn’t have any. I do have hand sanitizer to clean my media mat. That’s clear, pourable, and alcohol based. I wonder if alcohol ink will color it? Yes, it does! Just a couple drops is all I needed. So it kind of went like that… I’d be working on one thing, and it’d trigger an idea for a different “side”, and I’d go do that.

I wanted to do something special with the new confections candy corn. While I was working on this, there was a Tim Holtz live YouTube, showing makes for these products. I purposefully didn’t watch it, because I didn’t want to be influenced or distracted by the beautiful makes from his Design Team. However, I did hear about how he used the candy corn with tiny lights. I just had to go peak at that part of the replay! He made it sound so easy! Just drill holes in these teeny tiny plasticy candy corn! If you try this yourself, I’d recommend being very careful. Make sure you hold the corn with pliers, not your fingers! You might want to make a starting point for the drill with an awl or something. Otherwise the drill bit can move. Watch his video here. It’s at the end, around 3:19 timestamp. The corn is only slightly bigger than the 1/8″ drill bit that Tim recommended. I’m glad I added the corn this way, but it wasn’t easy. I messed up as many as I was successful with, but I got enough for my project, and I’m happy with how they look.

Although I was trying not to spend any more on this project, I felt like I did have to get the amber colored apothecary vials. I’m glad I did. I am not glad that I didn’t take the time to do more to them, like distress them more, but I felt like I had to draw a line in the sand as to how much time I was going to spend on this project! I also had some cards to get out, and regular life stuff to take care of! Some of the vials are empty, some have stuff in them, you can’t really see through the glass. I did have a little bit of a time trying to get the labels to stick that come with the apothecary vials. I first tried them out of the package, and then tried them with collage medium. I heard someone suggest to make sure they were clean before you try to apply the labels, which I will definitely do next time. I will probably wipe them off with alcohol first to make sure the labels stick.

I did most of my embossing powder and glaze at the same time. I’m happiest with the curtain, which is from the layers pack. I wanted the wood part to be an offwhite color, and the curtain part to be a light pink color to match the flowers in the worn wallpaper. I masked off the curtain pieces with bits of masking tape, then applied embossing ink with the dauber top applicator, and embossed the wood part using antique linen embossing glaze. Then I removed the mask, applied embossing ink with a marker, and embossed the curtain with saltwater taffy embossing glaze. I also used wild honey embossing glaze to color the paper doll’s dress, using both the embossing dauber and an embossing marker. Clear embossing powder was used on the bats.

I wasn’t sure what to put on the bottom shelf of the candy shop. I didn’t have anything that said “Confections”, so I went through the layers and ephemera packs, and found something about a florist. Some florists have candy as well, so I figured that would work. I used the paper “bouquet” idea-ology flowers, and sprayed each small cluster with different fall colored spray stains. I let them dry overnight. I played around with trying to display them, then had the idea of putting them in a flower cone, which I made out of a scrap piece of Tim Holtz paper that had a pretty sage green pattern to it.

On the bats and spider side, I used one of the halloween transparencies for the spider web. I cut it down so it would fit in the corner. I also added a small rectangular vignette box, so it would match the other two sides better. I used sewing thread to hang up the spiders, and rubbed white glue on the thread to stiffen it up.

To distress the bones, I added some grit paste. I had some Crypt grit paste leftover from last year’s Halloween release. After the grit paste dried, I rubbed on some vintage photo, antique linen, and peeled paint distress crayons with my fingers. Any grit paste will do, as you can alter the color of the paste with distress crayons after it dries. If you don’t have distress crayons, you could mix a tiny bit of re-inker in with the grit paste before you apply it to the bones, but it won’t have quite the same look. It will still be cool! Sometimes we have to use what we have!

The Sizzix Mischievous cats were fun. I die cut all of the cats using different black paper – shiny, matte, and glitter. My favorite black paper to use is the Tim Holtz black alcohol ink paper. It has almost a suede texture to it. Two of the cats were cut out with the halloween deco sheets. These sheets are very thin, glittered paper, with adhesive on the back. In hindsight, I might have put the deco sheet black paper on cardstock, then cut the cats out, and popped them up with dimensional foam on the back wall of that piece. I think they get a little lost directly adhered to the box. To make the cats stand up in the middle of the box, I used black foam board. I cut a piece the size of the inside bottom of the box, and then cut it in half again the long ways. I glued one piece down towards the back of the box, then stood up my two cats, and then glued the other piece down, holding them up in place. I wanted it to look like a room full of black cats! I glued three of the cats on the front face of the box. The extra one went into the flower/candy shoppe.

I used a little distress spray stain on the mummy cloth, including a little aged mahogany, trying to make it look like dried blood.

I didn’t start gluing everything together until I had my layout and pieces done. I had to figure out where I was going to put the tiny lights. I put the battery packs underneath the display panel, and drilled holes to string the lights up into the back of the boxes. I also ended up with enough extra that I could add drippy candles to the top of one of the boxes, and shape the tiny lights so that the candles look like they were lit.

One of the hardest parts of this project was getting started, and the other hard part was deciding when to stop! I really enjoyed working on this, but probably could have spent another week adding cool things. One of the great things about Tim’s products is that they all coordinate with each other. It’s hard to go wrong. Just start somewhere, and do what makes sense to you. Step away if you run out of ideas. The ideas will come if you try to relax and just enjoy the process. There will be lots of people who will “get” what you create. Some won’t, but it’s not for them, it’s for you! Thank you for stopping by!

Tim Holtz Idea-ology products used include:
vignette boxes (squares)
vignette display panel
halloween baseboards
halloween layers
halloween ephemera pack
halloween worn wallpaper scraps
halloween deco sheets
halloween transparencies
curiosities sticker book
apothecary vials
corked vials
halloween adornments
creepy eyes
boneyard
halloween confections
halloween confections – candy corn
confections (from 2021 holiday season)
halloween trimmings
halloween design tape
halloween paper dolls
halloween collage paper (from 2021 season)
crypt grit paste (from 2021 season)
black alcohol ink paper
distress embossing glaze in antique linen, saltwater taffy, and wild honey

Sizzix thinlits Mischievous #665996
Scrappy Shak tiny lights – warm white