
Hello crafty friends! I wanted to share this project that I made for the ScrappyShak Design Team. My Design Team friends and I were asked to make something with a potential new product line that Melanie, the owner, was exploring. The products are these adorable Woodland Animals that are laser cut out of Bass Wood. They are easily assembled into a 3D animal. Melanie had three different animals for us to use in a project: a deer, a bear, and a fox. I was drawn to the fox, as my new rescue pup is about fox sized, and has similar colors in her red brindle fur. Below is a photo of what the deer and the bear kits look like, and of course the fox kit is similar.
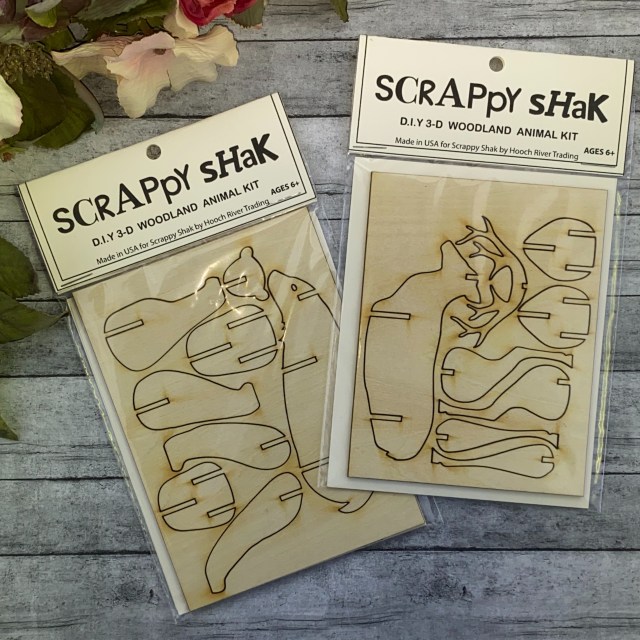
These kits are not yet available, but if you love them, we’d love to hear from you! They may be available soon, depending on feedback and interest from the Design Team posts. Please email Melanie@scrappyshak.com if you’d like to pre-order some of these! I used Distress paint, inks, and crayons on this wood with good success. It’s beautiful quality. I am more of a paper crafter than a painter… I considered using paper to cover the wood pieces before putting them together, but thought it would probably require a whole lot of cutting. For this project, I went with inks and paints.

I started by coloring my fox. I thought Rusty Hinge would be a great fox color. I tried painting some spray stain onto a scrap piece of the wood first, to make sure the wood would take the ink, which it did. I knew I wanted parts of the fox to be white, but white ink is hard… it’s never as intense as I want it to be. I didn’t think it would cover the wood as well as I wanted it to. Instead, I used Picket Fence Distress Paint, again testing a bit on a scrap piece of wood, before potentially messing up my fox. I thought I should apply the paint first, as it’s permanent when dry, and I can always adjust the ink with water if I had to. So I painted Miss Fox where I thought she should be white, and then added Black Soot Distress Paint to the tips of her ears, her nose, and her feet. I should say that I didn’t put her together until the end. I painted each “puzzle piece” separately, but had to fit them together at times to figure out how the colors should line up, like her cheek fluff. After the paint was where I wanted it, and dry, I painted the rest of her with Rusty Hinge Distress Spray Stain. After that was dry, and I removed any stray marks with water, I assembled her with a tiny bit of collage medium. Later, I used Walnut Stain Distress Crayon to add some shading around the edges to give her a bit of a primitive look. I suck at painting, and I can’t draw a straight line or a circle to save my life! I considered making her look more fur-like, adding different paint, or maybe texture paste, but I know when I’m out of my league! I didn’t want to make a mess, so I stuck with simple.
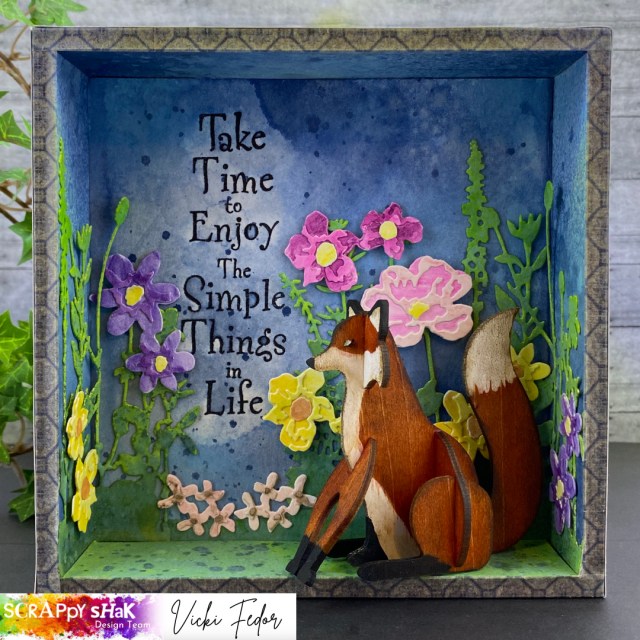
I thought Miss Fox would fit perfectly in the largest of the Square Vignette boxes. I wanted her to be sitting in a field of flowers. I started by creating a sky background, and then planned to add flowers with die cuts. I hadn’t figured it all out yet… I was kind of just winging it, which I have learned is not the best way to go, but I continue to do so anyways! For the background, I used Stormy Sky Distress Spray and Tumbled Glass Oxide Spray. I was happy how it came out, so I cut it to fit, and glued it inside my box. Then I thought… I should add a sentiment, or an inspiring quote… make this a pretty little decoration for a desk or a shelf. But… my glue had dried already. I tried stamping my sentiment inside of the box, but that was just a hot mess. No worries, it’s just paper. I took a step back, and made another sky colored piece for the inside of the box, but this time I stamped it before gluing it in the box. I stamped the sentiment (which was an older Hero Arts stamp) using my Misti and black VersaFine Ink, then embossed it with clear embossing powder.
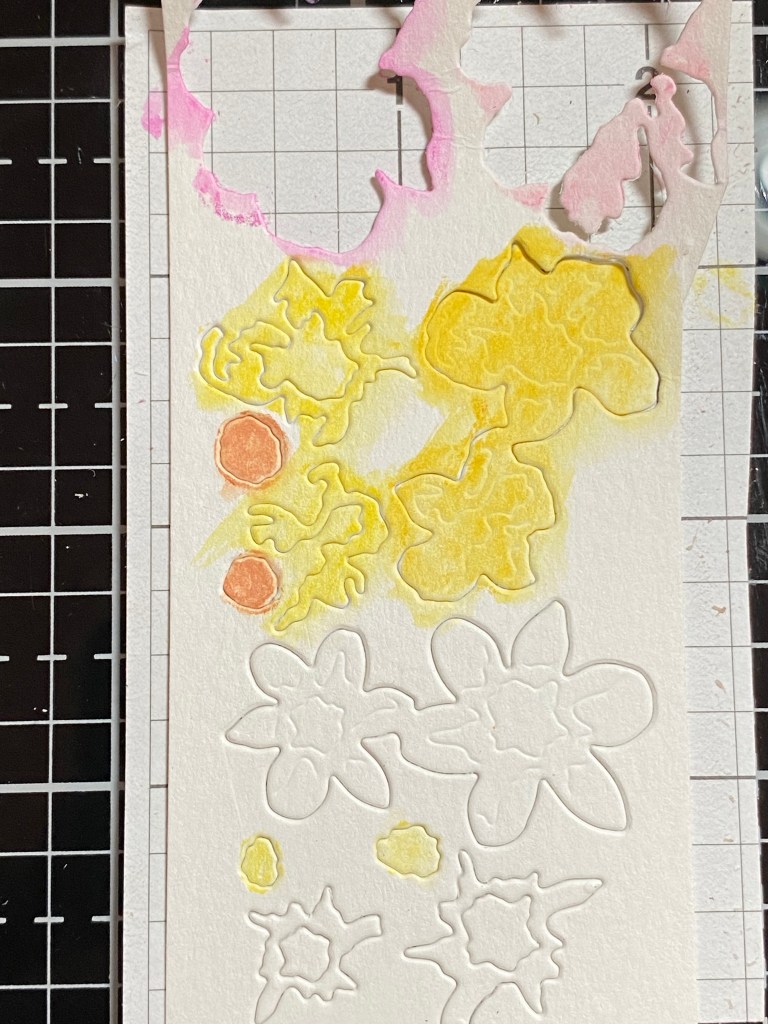

I wanted to use the new Brushstroke Flowers Mini dies to make the flowers. This took longer than I thought… the pieces for the flowers are soooo tiny! All of the piece to complete each type of flower are on one die. If the flower has three layers, you would either have to run the same die through your machine with each different color (for example, light pink, dark pink, and yellow for the big rose type flower in my project), or use white cardstock and color each piece individually. This is what I did. Since the pieces are so small, to hold them in place, I used a piece of Sticky Grid underneath, and left the die cuts in the negative space. This helped to hold them while I colored them, and I didn’t lose anything. I used Distress Watercolor Pencils and a waterbrush to color the die cut pieces. I chose to use the watercolor pencils because they are highly pigmented, and I knew they would give me some nice, rich colors for my flowers. I scribbled a little pencil onto each piece, and then blended it out with the waterbrush. I didn’t worry about being precise here, and I think being a little “free” with the coloring added some interest to the flowers.
The leaves in the Brushstroke Flowers Mini set are teeny tiny as well. I wanted something to fill up more of the space, so I went back to an older die that I had in my stash, the Flower Field die. I colored some watercolor paper with Rustic Wilderness and Mowed Lawn, made a couple die cuts out of it, and attached them inside of the vignette box, wrapping them up the sides as well. If you don’t have this die, you could certainly use any kind of flower stems you might have. Or use the leaves that come in the set, and cut strips of paper for the stems. There are lots of different ways to achieve a similar look. It’s the fox and the flowers, and the sentiment, that will draw people’s attention. Use what you have!
To finish up, I covered the outside of the box with idea-ology Paper Stash paper, and used Design Tape to finish the front edge of the box, for a clean look. Of course at the very end, I thought I should have added Tiny Lights! Another reason not to glue anything down until the very end!
Thank you for stopping by my blog, I appreciate you!
Products used, available at ScrappyShak:
ScrappyShak D.I.Y. 3-D Woodland Animal Kit: Fox
Tim Holtz Idea-ology Square Vignette Boxes
Tim Holtz Sizzix Brushstroke Flowers, Mini
Distress Crayon – Walnut Stain
Distress Spray Stain – Stormy Sky, Rustic Wilderness, Rusty Hinge
Distress Oxide Spray – Tumbled Glass, Mowed Lawn
Distress Paint – Black Soot, Picket Fence
Distress Watercolor Pencils – Sets 1 and 2
Also used:
Tim Holtz Sizzix Flower Field
Tim Holtz Idea-ology Paper Stash
Tim Holtz Idea-ology Design Tape – Butterfly/Papillon/Mariposa
